One of my favorite things to experiment with in Fusion is its particle system. They are a fantastic tool to create things like smoke, sparks, and magic. Their utility doesn't stop there, though. A common technique in 3d software is to attach instanced geometry to particles and use the simulation engine to create procedural motion. Fusion can do the same thing, although its tool set for directing the particles is more limited than what you would find in Maya or 3DS Max.
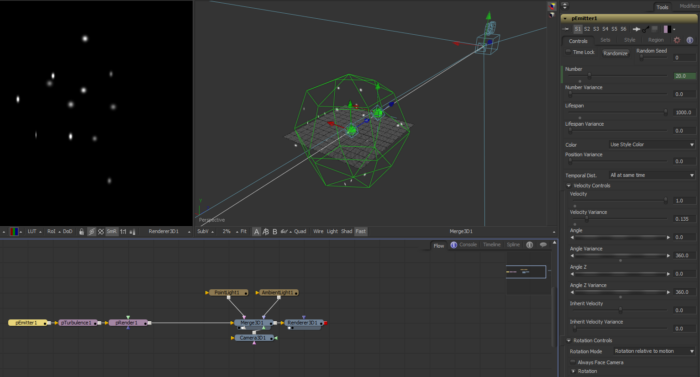
Here you can see a simple particle set-up that I've created for this tutorial:

Set the pEmitter node's Region to Sphere, and increase the size in order to fill the screen with particles. Animate the Number control so that 10 particles spawn on frame 0, and no more are created. In this image, the particle Style is set to Blob, and I have increased the Size so that you can see them in the viewport. This technique works just fine with Points, but I wanted you to be able to see the effect of the rotation controls: Blobs are usually circular, but you can see here that many of them have been rotated on the Y axis, presenting their edges to the camera. "Rotation relative to motion" causes the particles to orient themselves along their trajectory, and turning off Always Face Camera is necessary to allow them to rotate freely in 3d space.
The pTurbulence node provides some motion for the particles. For this demo, the Strength is 2 in all three dimensions, and Density is only .01. These settings will impose a gentle flocking action on the particles.
The next step is to add our geometry. In this case, I have used a Shape 3D node set to Cone in order to get geometry that will show off the auto-orient feature in the particles. In the Material tab, the Diffuse and Specular colors have been set to a medium gray. You aren't limited to using Fusion primitives; the FBXMesh3D node will let you import files in several different formats: FBX, OBJ, Collada, and AutoCAD, among others. I most recently used particle systems to create a distant battle as a backdrop for a space scene; each spaceship type got its own system, and they swarmed around one another quite nicely.
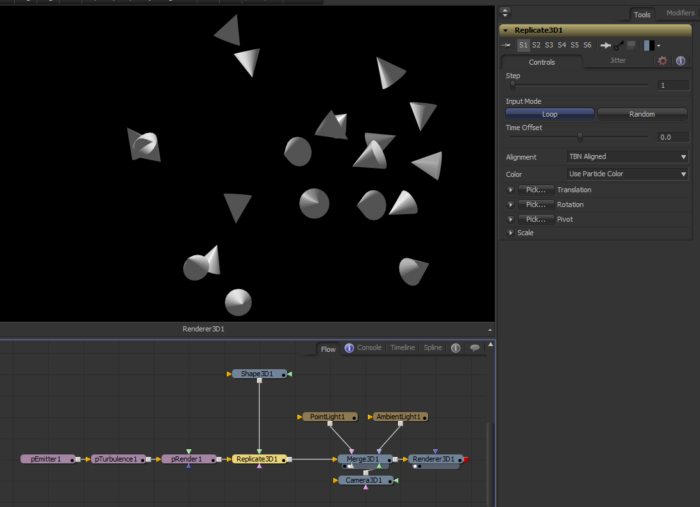
To instance the geometry to the particles, you need a Replicate 3D node, which goes between the pRender and the Merge3D. The pRender plugs into the gold input, and your 3d geometry goes in the green.

As you can see, each particle has been replaced by a cone. Replicate3D can also be used to place an object at the vertices of an existing mesh, and the incoming objects can be animated. They don't have to be geometry, either; a point light could be used to create interactive light from your particles or mesh. I have never tried that, but theoretically it should work.
Switch Alignment to "TBN Aligned." (That stands for "Tangent, Normal, Binormal." I don't have a firm grasp on the mathematics, so I'll just leave it at that.) Now the cones will change their orientation as they move about. Unfortunately, the particles rotate their X-axis toward the direction of the travel, and a cone's point is toward the Y-axis. It will look better if the cones orient with their points aimed forward, so rotate the cone 90 degrees in Z. Here's the result:
geoToParticles_v01 from Bryan Ray on Vimeo.
That's all there is to it! But I have a little bonus; I mentioned earlier that I used this technique to create a space battle, but what's a space battle without lasers?
geoToParticles_v02 from Bryan Ray on Vimeo.
In this scene, I have copied the particle system and added a pSpawn node to create the lasers. pSpawn is used to create particles using other particles as a source. A more common use of pSpawn is to give a particle a trail, like smoke coming from debris or a glowing trail of pixie dust. If you are familiar with the Particular plug-in for After Effects, pSpawn works like the Aux system in that plug-in, except that you aren't limited to having only a single secondary emitter—you can create as many as you need, and you can even allow pSpawn to act on the particles it emits itself! (Careful with that, though. You need to strictly control of the number of particles that get emitted, or you wind up with billions over the course of just a few frames.)
The Replicate3D will affect every particle coming out of the pRender node, so you need a separate copy of the system in which the cones are invisible. Use the Style tab to make the particles invisible. Leaving them in Points mode and setting their color to black with 0 alpha should do it. In the Sets tab, check Set 2. Other than those two tabs, it is important that the particle system upstream of the pSpawn be identical to the original in order to keep the visible cones in registration with the invisible spawn sources. I probably should have instanced them instead of simply copying. You can deinstance portions of an instanced tool by right-clicking on the control you want to make independent and choosing "deinstance [control name]."
Add the pSpawn after the pTurbulence. In the Sets tab, check Set 1, then switch back to Controls. Set Number to 1.0 so each cone will only be able to fire a single laser at a time. Set Lifespan to 10—I will explain the reason for that in a few moments. In the Velocity Controls spin-down, make sure that Velocity Transfer is set to 1.0. That will cause the spawned particles to inherit the motion of the cone, ensuring that they always fire forward. However, that alone would simply cause the lasers to stick to the nose of the ship. In order to get them to accelerate away, you will need a pCustom node. pCustom is similar to the Custom Tool, except that instead of acting on pixels, it acts on particles. You can set an expression on any quality of a particle, giving you incredible control, although it is sometimes difficult to manage.
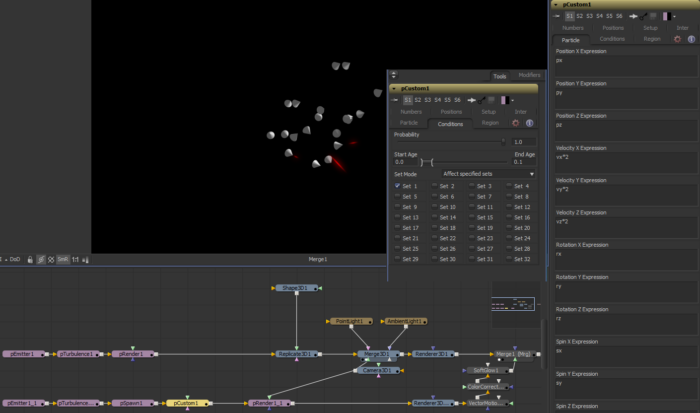
Here are the settings I have used in my pCustom:

You can see that I have simply multiplied each particle velocity vector by 2 to cause them to move away from the cones. However, the expression evaluates on each frame, so simply leaving it at that will cause the laser to accelerate too much; they would only be visible for a frame or two. We only need to multiply the speed on the first frame. You can limit the time during which a particle node will affect a given particle in the Conditions tab. The Start and End Age control determine how long and when the node will affect a particle. The lasers have a lifespan of 10, so in the Conditions tab, set the End Age of the effect to 0.1. The pCustom expressions will therefore only evaluate in the first tenth of the particle's life—one frame. We can also use this tab to limit which groups of particles are affected. Recall that we set the invisible cones to Set 2 and the spawned lasers to Set 1. Change Set Mode to "Don't affect specified sets" and uncheck Set 1. Now pCustom will ignore everything except the lasers.
At this point, you probably have far too many lasers firing. Every ship shoots on every frame. To calm things down, you can use the Conditions tab in pSpawn to control how often the cones fire their guns. Turning Probability down to .01 causes each ship to have only a 1% chance of firing in a given frame. There are 20 ships in the scene, so lasers are fired in roughly 1 out of every 5 frames.
From here it's a matter of tuning the look of the lasers. I made a separate Renderer3D because I want to use VectorMotionBlur to turn the Blobs into beams, but I don't want to blur the cones themselves. Since there is nothing else in the 3d scene with the lasers, you can simply plug the camera directly into the pRender node. In the Renderer3D node, turn on Vectors in the Output Channels. The default settings in VectorMotionBlur seemed pretty good to me, so I left them alone. You could change the Scale if you want longer or shorter beams. It is possible to use the Motion Blur feature in the Renderer3D and pRender nodes to apply the blur, but motion blur on particles is terribly slow. Using vectors is much less painful.
I hope you enjoyed this exploration of Fusion's particles. If you would like to explore my comp, you may download it here: geoToParticles_v01
If you do anything interesting with the technique, I'd love to hear about it in the comments!
Hi Bryan,
many thanks for your article and the rest of your website contents.
I am trying to link/instance point lights to particles.
As described in your tutorial, I used the Replicate3D node the same way you attached a geometry (input) to particles (destination), and wired the Replicate3D between the pRender and the Merge3D nodes.
It does not work for point light. The point light just lays in the middle of the scene, with no replication.
Cannot figure out what I do wrong.
I am using Fusion 9.02 and I also tried in Fusion 16 with no success.
Do you have any idea on how to link point lights to particles?
Hope you can help. Many thanks.
Salvatore
It works as expected for me. pRender to the Destination input, and the Point Light to Input1. Then the output of Replicate3D to the Merge3D node (don't put the PointLight directly into the Merge, or you'll get a copy tied to the center of the scene.
The only trouble I have is that the lights' color cannot be controlled by the particle color. Give this a try:
{

	Tools = ordered() {

		Replicate3D1_1 = Replicate3D {

			Inputs = {

				Destination = Input {

					SourceOp = "pRender1",

					Source = "Output",

				},

				Input1 = Input {

					SourceOp = "Shape3D2",

					Source = "Output",

				},

			},

			ViewInfo = OperatorInfo { Pos = { 660, 115.5 } },

		},

		Replicate3D1 = Replicate3D {

			Inputs = {

				PerParticleColors = Input { Value = 2, },

				Destination = Input {

					SourceOp = "pRender1",

					Source = "Output",

				},

				Input1 = Input {

					SourceOp = "PointLight1",

					Source = "Output",

				},

			},

			ViewInfo = OperatorInfo { Pos = { 770, 115.5 } },

		},

		Shape3D2 = Shape3D {

			Inputs = {

				Shape = Input { Value = FuID { "SurfaceSphereInputs" }, },

				["MtlStdInputs.MaterialID"] = Input { Value = 3, },

				["SurfacePlaneInputs.ObjectID.ObjectID"] = Input { Value = 3, },

				["SurfaceSphereInputs.Radius"] = Input { Value = 0.09, },

				["SurfaceSphereInputs.Lighting.Nest"] = Input { Value = 1, },

				["SurfaceSphereInputs.Lighting.IsAffectedByLights"] = Input { Value = 0, },

				["SurfaceSphereInputs.ObjectID.ObjectID"] = Input { Value = 4, }

			},

			ViewInfo = OperatorInfo { Pos = { 660, 49.5 } },

		},

		pDirectionalForce1 = pDirectionalForce {

			ID = 16,

			Inputs = {

				Strength = Input { Value = 0.1726, },

				Input = Input {

					SourceOp = "pTurbulence1",

					Source = "Output",

				},

			},

			ViewInfo = OperatorInfo { Pos = { 385, 181.5 } },

		},

		Shape3D1 = Shape3D {

			CtrlWZoom = false,

			Inputs = {

				["Transform3DOp.Rotate.X"] = Input { Value = -90, },

				["Transform3DOp.Scale.X"] = Input { Value = 5, },

				["MtlStdInputs.Diffuse.Color.Red"] = Input { Value = 0.23, },

				["MtlStdInputs.Diffuse.Color.Green"] = Input { Value = 0.23, },

				["MtlStdInputs.Diffuse.Color.Blue"] = Input { Value = 0.23, },

				["MtlStdInputs.MaterialID"] = Input { Value = 1, },

				["SurfacePlaneInputs.Width"] = Input { Value = 100, },

				["SurfacePlaneInputs.ObjectID.ObjectID"] = Input { Value = 1, }

			},

			ViewInfo = OperatorInfo { Pos = { 385, 247.5 } },

		},

		pBounce1 = pBounce {

			ID = 15,

			Inputs = {

				Input = Input {

					SourceOp = "pDirectionalForce1",

					Source = "Output",

				},

				Region = Input { Value = FuID { "MeshRegion" }, },

				["MeshRegion.MeshInput"] = Input {

					SourceOp = "Shape3D1",

					Source = "Output",

				}

			},

			ViewInfo = OperatorInfo { Pos = { 495, 181.5 } },

		},

		pTurbulence1 = pTurbulence {

			ID = 7,

			Inputs = {

				XStrength = Input { Value = 5, },

				YStrength = Input { Value = 5, },

				ZStrength = Input { Value = 5, },

				StrengthOverLifeLUT = Input {

					SourceOp = "pTurbulence1StrengthoverLifeLUT",

					Source = "Value",

				},

				Input = Input {

					SourceOp = "pEmitter1",

					Source = "Output",

				},

			},

			ViewInfo = OperatorInfo { Pos = { 275, 181.5 } },

		},

		pTurbulence1StrengthoverLifeLUT = LUTBezier {

			KeyColorSplines = {

				[0] = {

					[0] = { 0.5, RH = { 0.3, 0.5 }, Flags = { Linear = true } },

					[1] = { 0.5, LH = { 0.7, 0.5 }, Flags = { Linear = true } }

				}

			},

			SplineColor = { Red = 192, Green = 128, Blue = 64 },

			NameSet = true,

		},

		Merge3D1 = Merge3D {

			Inputs = {

				SceneInput1 = Input {

					SourceOp = "Shape3D1",

					Source = "Output",

				},

				SceneInput2 = Input {

					SourceOp = "Replicate3D1",

					Source = "Data3D",

				},

				SceneInput3 = Input {

					SourceOp = "Replicate3D1_1",

					Source = "Data3D",

				},

			},

			ViewInfo = OperatorInfo { Pos = { 715, 247.5 } },

		},

		pRender1 = pRender {

			Inputs = {

				_MotionBlurWarning = Input { Disabled = true, },

				GlobalIn = Input { Value = 1, },

				Width = Input { Value = 1920, },

				Height = Input { Value = 1080, },

				["Gamut.SLogVersion"] = Input { Value = FuID { "SLog2" }, },

				OutputMode = Input { Disabled = true, },

				IntegrationMethod = Input { Value = FuID { "RK4" }, },

				["MaterialID.MaterialID"] = Input { Value = 2, },

				["ObjectID.ObjectID"] = Input { Value = 2, },

				Input = Input {

					SourceOp = "pBounce1",

					Source = "Output",

				},

			},

			ViewInfo = OperatorInfo { Pos = { 605, 181.5 } },

		},

		PointLight1 = LightPoint {

			Inputs = {

				Intensity = Input { Value = 5, },

				DecayType = Input { Value = 2, },

			},

			ViewInfo = OperatorInfo { Pos = { 770, 49.5 } },

		},

		pEmitter1 = pEmitter {

			ID = 2,

			Inputs = {

				Number = Input {

					SourceOp = "pEmitter1Number",

					Source = "Value",

				},

				Lifespan = Input { Value = 1000, },

				["ParticleStyle.SizeOverLife"] = Input {

					SourceOp = "pEmitter1SizeoverLife",

					Source = "Value",

				},

				["ParticleStyle.BlurOverLife"] = Input {

					SourceOp = "pEmitter1BluroverLife2D",

					Source = "Value",

				},

				["SphereRgn.Translate.Y"] = Input { Value = 18.8001145688887, },

				["SphereRgn.Size"] = Input { Value = 36.92, }

			},

			ViewInfo = OperatorInfo { Pos = { 165, 181.5 } },

		},

		pEmitter1Number = BezierSpline {

			SplineColor = { Red = 233, Green = 206, Blue = 78 },

			NameSet = true,

			KeyFrames = {

				[1] = { 10, RH = { 7, 6.66666666666667 }, Flags = { Linear = true } },

				[19] = { 0, LH = { 13, 3.33333333333333 }, Flags = { Linear = true } }

			}

		},

		pEmitter1SizeoverLife = LUTBezier {

			KeyColorSplines = {

				[0] = {

					[0] = { 0.5, RH = { 0.3, 0.5 }, Flags = { Linear = true } },

					[1] = { 0.5, LH = { 0.7, 0.5 }, Flags = { Linear = true } }

				}

			},

			SplineColor = { Red = 192, Green = 128, Blue = 64 },

			NameSet = true,

		},

		pEmitter1BluroverLife2D = LUTBezier {

			KeyColorSplines = {

				[0] = {

					[0] = { 0.5, RH = { 0.3, 0.5 }, Flags = { Linear = true } },

					[1] = { 0.5, LH = { 0.7, 0.5 }, Flags = { Linear = true } }

				}

			},

			SplineColor = { Red = 192, Green = 128, Blue = 64 },

			NameSet = true,

		}

	}

}
Thank you Bryan,
So I was doing right.. kind of.
The problem was why I could not visualise the replicated point lights in my scene.
Turned out that it was just a visualization issue..
So at the end those tiny little luminous points appeared in the rendered scene.
Also, as a feedback in 3D viewport, I was expecting to see the point lights distributed on top of particles (like 3D objects with their own gimbal), instead of seeing the only light I fed to the Replicate3D.
Anyways, sometimes (or quite often i would say) I get weird viewport's reponses / not-correct updates. Sometimes it gets fixed when changing frame in timeline, other times it does not. Not sure if it's a problem with caching or gpu driver.
Anyways my case seems solved, and I thank you again.
Salvatore
Right, Replicate3D doesn't create a full object; it just makes an instance without any independent controls. If you move the transform widget, all the instances will move that distance away from the particle they're following.
As for your viewport issues, Fusion can be sensitive to some driver versions. You might try updating if you're not on the latest, or stepping back a few versions if you are. Particles sometimes don't behave themselves if you scrub the timeline—since their data is cumulative, they do best if you just let them play. They also sometimes don't properly let go of their cache. You can purge the cache manually by right-clicking on the memory % indicator in the lower right corner of the application window.
Thank you