The creation of mattes from moving footage is a crucial, though sometimes tedious, part of making visual effects. It is a rare shot that does not require a matte of some kind. Let's first talk about what exactly a matte is and a few methods that can be used to generate them.
First, the words matte and mask are used mostly interchangeably, although matte is not often used as a verb. A matte is a single-channel image that is used to isolate a part of an image, either to prevent it from being changed or to restrict changes to only that area. You might hear the term traveling matte, which simply means the matte image moves to follow whatever object in the scene it is meant to isolate. You might also run across reference to an articulated matte or roto, which means a matte made up of several pieces that can move independently to cover something complex, like a person.
Rotoscoping (roto, for short) uses splines, like the Polygon tool we used in the Basics lesson, to create outlines around a subject. It is a time-consuming job that is frequently assigned to junior compositors or dedicated roto artists in order to save the mid- and senior-level artists (and their higher salaries) for more demanding tasks. As such, it's an important skill to learn to do well and quickly if you want to show your worth to a visual effects studio.
 Keying uses the color values in the image to try to separate the subject from the background. Although the most obvious use for keying is isolating actors on a green or blue screen stage, it can also be used on any object that is of a different color than whatever surrounds it. In the previous lesson, we could have used a keying operation to make a matte for the orange gun barrel and possibly skipped the tracking step entirely.
 You might also receive mattes rendered from the CG department. This image shows a so-called "clown pass," in which each piece of the Camaro is assigned a different flat color, allowing the compositor to easily affect one piece of the car without touching the others (although making the hood stripes and the windows both yellow was a bad move. Hopefully there's also a refractions pass that can be used to separate the glass.)
Rotoscoping
For this lesson, I have prepared a short greenscreen clip from another of my student projects. I can't for the life of me remember either of these two gentlemen's names, but I do remember that they were a delight to work with. To start, we'll rotoscope the man on camera right (we specify camera, screen or stage right in order to make it clear that we don't mean the actor's right. It's easy to completely change the action of a shot with that kind of misunderstanding), then we'll key the man on camera left. Download the footage here: 004-mattes_plate.zip (95.8 MB)
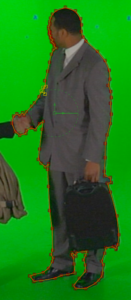 A human being is a very complex shape, with many moving parts that deform and can move independently. As someone turns around, their silhouette can change completely. Many beginning rotoscopers start by trying to draw a single spline around an actor, as shown in the image to the right.
As soon as you start playing through the sequence, though, you'll quickly realize how much work it will be to manage that shape. Instead, try to analyze the actor's body and accessories. Determine which parts of him travel together and are unlikely to change shape much.
The lower legs, the thighs, the torso, the upper arms, the lower arms, the hands, the head, and the suitcase are each much simpler shapes that could be more easily managed. By splitting the subject into piece like this (articulating it), you can let the computer do more of the work interpolating between extremes.
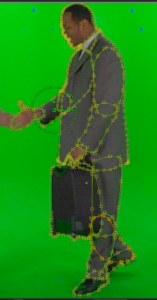 Pay attention to how the subject moves. Find the places where a particular piece of him changes direction, or starts or stops moving. Find the apex of a curved motion or the place where the hand is most open. In this case, I elected to draw my splines for the extended hand when it was most open and complex. I made a separate shape for the thumb because I saw that it closed down over the other man's hand and therefore moved a little differently than the rest of the hand.
Fusion automatically sets keyframes on the splines you create. You can manipulate the animation, setting keys or removing it, by right-clicking the bottom most line in the Tools panel. It will also set a keyframe on the entire shape any time you move a 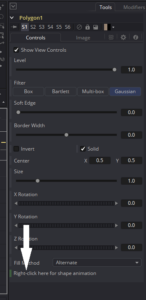 point. That's another reason to use smaller shapes—you may not need keyframes on the head in the same place you want them for the hands, but if you have just one big shape, you don't have a choice about it. The points don't get individual keys.
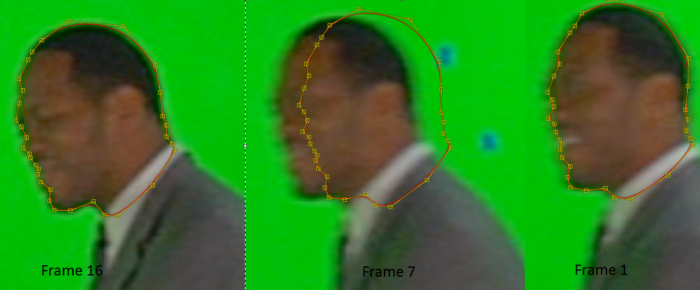
Once you've created the initial position for a spline, move down the timeline until you find the other extreme of whatever motion you observed. Drag a selection around your spline and move it to the new position. Fusion will interpolate between the old position and the new, hopefully keeping the spline fairly close to whatever it's intended to follow.
In this image, I have placed keys at frames 1 and 16. Frame 7 is Fusion's interpolation between the two. To continue the task, I select the points at Frame 7 and move them back to the head. You may notice that this spline doesn't have the Bezier handles that you saw on the Polygon. This is a different type of spline, called the B-Spline in both Fusion and Nuke. The After Effects equivalent is the Roto-Bezier, and some software, like Mocha, calls it an X-spline. I prefer it for organic shapes because it has fewer controls to keep track of, although it tends to require more points.
Try not to move individual points if you can help it. The matte will tend to "crawl" if the points change position relative to one another. If you need to rotate the entire spline, hold the T key ("twist") and click-drag with your mouse. You can scale by holding S, or scale along just one axis by holding X or Y while dragging. In a B-Spline, you can also change a point's smoothness—how much of an angle it has, by holding W while dragging.
Set a keyframe at each extreme of motion you see, then go back and check the frames in between, adjusting the spline as needed, then check between the original and the new keyframe, and so on, until the spline is correct on every frame. Hopefully you won't need to set keys on every frame, but in some cases it's necessary. My very first job was rotoscoping a woman with long, fine hair and loose clothing standing in front of a wind machine. There was nothing to do but put a key on every single frame.
Sometimes it's difficult to see exactly where your subject ends. Blur and anti-aliasing make some edges vague. If the edge is reasonably uniform in blurriness, the Soft Edge and Border Width controls can take care of handling the blend. If there is motion blur, then Fusion's Motion Blur features can usually match it. In those cases, decide where in the blur you want your spline to fall and stick to that decision all the way around and throughout the entire clip. I usually use whatever I determine is the first fully opaque pixel. 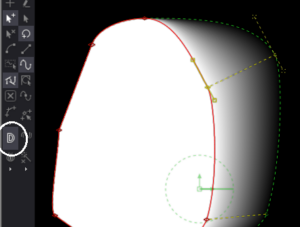 If you need a varying amount of blur around an object—if you know an effect needs to fade off, for instance, or you have an extremely shallow depth of field (the blur gets stronger based on distance from the camera)—you can turn on the double spline mode in your tool to create a smooth falloff between the main spline and a secondary shape that you pull off from it.
Roto is a simple task, but it's time-consuming. Don't get discouraged if it takes you several hours to roto even a simple shot. You'll get faster with practice, but some shots will simply take a long time. If they didn't, the seniors would just do the work themselves. Remember, though, that you should take every opportunity you can to simplify matters for yourself. Apply what you know about tracking to automate moving splines. There are also some specialized tools, like Mocha and Silhouette, that can make roto easier and faster.
To conclude this part of the lesson, here are a couple of things to keep in mind: It is far easier to rotoscope a positive shape than a negative one. That is, if you are tasked to roto a window behind an actor, don't try to make a shape for the left side of the window and the actor's left profile and another for the right side and the actor's right profile. Instead, roto the actor and use that to cut a hole in the shape you make for the window.
When you are finished with a spline, use its Level control to turn it off instead of sending it off-screen. The compositor who uses your mattes may wish to turn on motion blur, and when the spline suddenly flies off the edge of the screen, it leaves a streak behind. You can move it once it's remained still and invisible for a frame or two.
Like all of Fusion's tools and workflows, there is a lot more to learn about the Polygon and B-Spline tools, and about the process of rotoscoping. We'll return to the topic several times during future lessons.
Keying
The second method to create a matte is to use contrasts in the image's color information to generate it automatically. This is known as keying. When a green or bluescreen is used, it is more specifically called chroma-keying. Fusion comes with five keying tools, although one, the Difference Keyer, is not useful for this purpose.
Luma Keyer
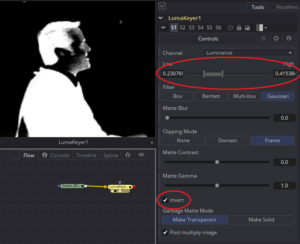
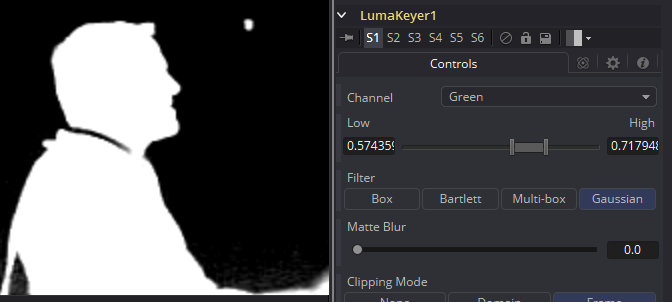
We'll start with the Luma Keyer. In its default mode, the Luma Key attempts to create the matte by making the brightest parts of the image white and the darkest parts black. Create a Luma Keyer, connect it to the Loader, and put it in your Viewer. Click the Viewer's Channels button to look at the alpha. Like the Tracker and Color Corrector, the Luma Keyer works best in a gamma corrected space, so I'm going to leave my image in sRGB for the time being. I also toggled the Invert control because we want the actor's matte to be white on black rather than the reverse.
The Luminance mode isn't much good in this case because our subject's collar is brighter than the background, and his face is about the same brightness. Even after I have adjusted the Low and High threshold values to get purer blacks and whites, it is clear that the face and collar will not be part of the matte.
If you look at each of the color channels, though, by selecting the Viewer and hitting the R, G, and B keys, you can see that the green channel has a great deal of contrast with everything except that collar. Change the Channel control to Green and adjust the Low and High thresholds again to get a somewhat better result.
The collar is still a problem. There are a few other modes we can try, though. The consequence of shooting on a screen that is such a pure green is that the screen is quite likely the most saturated thing in the image (saturation is measured as the difference between the brightest channel and the other two. Since the screen is almost white in the green channel and black in the red and blue, it is highly saturated. We'll hit some color theory eventually, too, where we can go more deeply into that topic.)
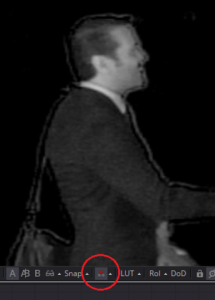 Switch the tool to Saturation mode and try adjusting the thresholds again. Unfortunately, this is even worse than the green. The doofus who set up this camera (me) evidently forgot to turn off the internal sharpening filter. You probably saw the dramatic ringing in the red and green channels. That bright outline is causing the saturation key to break down.
So it looks like the Luma Keyer isn't going to get us where we need to be. In fact, that sharpening is probably going to stymie even our best efforts. Nevertheless, we'll carry on and see if we can't salvage something from this footage.
Chroma Keyer
The next weapon in our arsenal is the Chroma Keyer. This tool is designed specifically to deal with screens of this sort. Maybe it will give us better results. The Chroma Keyer works by sampling the screen color and setting thresholds on all three color channels plus the luminance simultaneously to try to make just that color transparent. Sampling the color is done simply by clicking on the green screen in the Viewport. Clicking just one pixel probably won't do much. The Chroma Keyer lets you drag out a selection box around a group of pixels, though, and all of those pixels are considered for the thresholds.
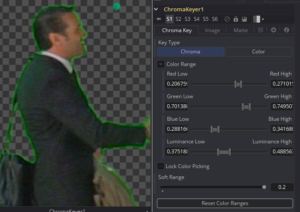 You can make several such selections, and each time you do, more colors are added to the transparency. After getting rid of most of the large blocks of green and pushing the Soft Range all the way up, we start to get something that might just be passable. There is still more work to be done, of course, but the Chroma Keyer has certainly done a much better job than the Luma Keyer did. In the screenshot, you can see that I have spun down the Color Range controls, so we can see all of the thresholds that have been set. Any pixel that falls into all four ranges shown is considered transparent. The Soft Range control blurs the ends of the thresholds, allowing pixels near the boundaries to become translucent.
In order to clean up the green fringe, we'll use a Matte Control tool. Matte Control is a very useful tool for dealing with alpha channels. It can combine them in various ways, blur them, erode and dilate them, change their falloff, and, most importantly for this image, it can despill and defringe. Make a Matte Control and place it after the Chroma Keyer. Switch over to the Spill tab to see what options we have for controlling that fringe.
The very first thing to do is to switch the Spill Color from Blue to Green. Obviously, we have a green screen, so our spill is also going to be green. "Spill" is the reflected colored light from the screen falling on the actor. It will be present to some degree in any chroma key shot, but Fusion's Matte Control is a superb means of getting rid of it. The Spill Suppression control determines how strongly the despill operation is applied. The Spill Method is a selection of four humorously-named algorithms, from least-dramatic to most-dramatic. Rare and Medium are usually most useful for blue screens, which produce comparatively less spill. Well Done is typically the best for green screens, and Burnt can kill even the strongest spill, but it tends to add too much of the complementary color (magenta is complementary to green and yellow to blue).
 The Fringe controls are a simple color corrector that is applied only to pixels that are translucent. The Fringe Size can push it into neighboring pixels (both fully opaque and fully transparent) if you need to blend the fringe with the rest of the picture. With a combination of the Spill Suppression and the Fringe controls, I can get rid of the green halo, but that black line is just not going to go away. At least, not with these controls.
Still, given the very poor quality of the footage, this is a result I might be able to live with. I put it in front of an actual background just to see how it holds up on something other than the checkerboard. Surprisingly well, actually. If I put them in front of a bright background like this one and let the lightwrap and edge blur take care of the black line, it might even work. I still want to look at that last keyer, though, and see if it can get even better.
UltraKeyer
UltraKeyer is a third-party keying plug-in that is included with Fusion. It functions much like the Chroma Keyer, but it has a couple of other controls. I am not 100% sure what the additional controls are doing, mathematically, but I can guess. Background Correction is probably applying a hue shift to try to compensate for screens that are not pure blue or green. Matte Separation is likely a saturation adjustment to further push the greenscreen's levels away from the foreground's. The PreMatte Range works exactly like the Chroma Keyer, except that if you are looking at UltraKeyer's output while you select colors, you're going to get a tainted selection. UK has already started to make the matte as soon as it is added to the flow, so you have to pick your screen colors from a Viewer that is displaying a tool upstream of the keyer. I usually put the footage in Viewer 2 and the keyer in Viewer 1 so I can easily see the results of my color picking.
Ultra Keyer also has a Matte Control tool built-in, so you don't need a separate node. After a few minutes of experimentation, I decided that Ultra Keyer wasn't going to do any better than the Chroma Keyer and Matte Control I'd already set up.
Primatte
There is one final color keying tool available in Fusion that doesn't show up if you Ctrl-Space and search for Key, but you may have seen it if you searched the Add Tool menu for the others (it's in the Matte folder). Primatte is another third-party tool that operates on an entirely different principle than the Chroma and Ultra Keyers. It also has a much more intimidating interface.
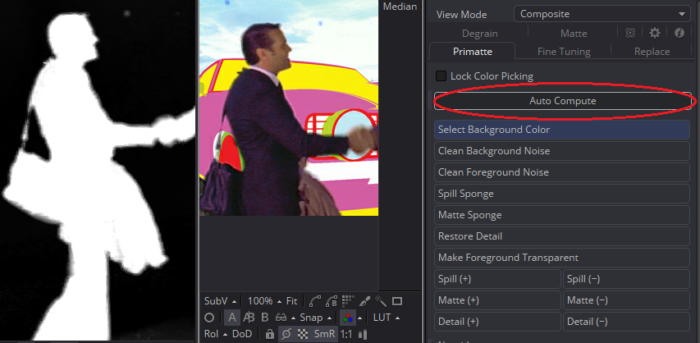
Most of the time, I really only use a few of the features in Primatte. I have to admit that I am not an expert with it, preferring to do most of my matte refinement outside of the keyer. So the first thing to try is the Auto Compute button at the top of the interface.
Impressive! One click, and already we have a nicer matte than the Chroma Keyer made. The spill suppression is too strong, though; it's created a magenta cast in the actor's suit. Let's back up and actually do the work instead of letting the automagical algorithm make all the decisions.
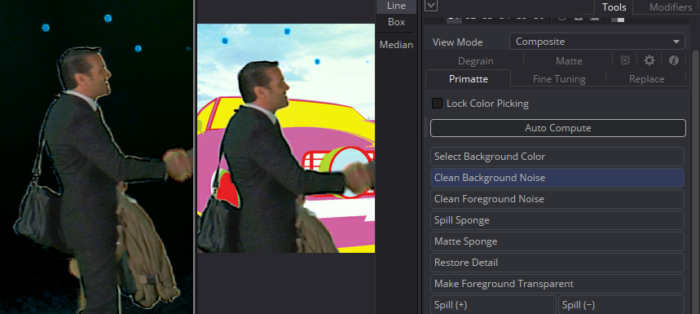
As with the other keyers, the first step is to select the background color. Primatte operates by using the color picker in several different modes. When you first add it to the comp, you'll be selecting the background. Primatte doesn't use a selection box, but a paint stroke. Click drag across a range of background colors, and you will see the screen disappear. Just do this once. To get rid of the remaining background, we'll switch to Clean Background Noise.
As you can see here, the matte is a little harsh, but we haven't introduced too much magenta into the image yet. Drag your sampling line across some of the pixels in the background that are still visible. Don't worry about anything that's more than a few pixels outside the guy's outline; we can mask that out with a garbage matte. We're mostly concerned with the edge here.
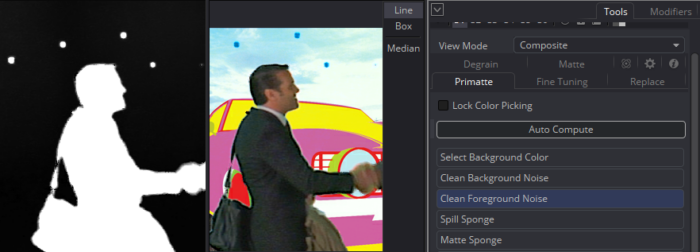
With the background gone, we can switch to Clean Foreground Noise and sample any pixels in the interior of the matte that are transparent. In my case, Primatte did a pretty good job, and I don't see any foreground noise.
Switch back and forth frequently between looking at the color image and the alpha when you're keying. Some problems will show up in one that don't show in the other. For instance, it's often difficult to see noise in the matte if you're just looking at the color, but you won't see that dark fringe if you only look at the alpha.
I could keep noodling at the matte for a while, resetting and trying different sample points, but I think this is a reasonable result for my purposes. I switched to the Spill Sponge to get rid of the green and, like the Auto Compute button, it added far too much magenta. In order to get back some of the real color, use the Spill (+) mode. Sample a spot that is too magenta, and some of the spill suppression will be removed. You will probably have to do this several times in several areas to get the image back to a pleasing color. If you take it too far, you can switch to Spill (-) to gradually remove the green you've reintroduced.
I seldom use the Matte Sponge mode because it usually adds far too many colors back to the foreground, destroying the work I've done. Restore Detail can be used to get back edge pixels that have been removed from the matte, making them translucent. Generally, I find that Primatte is not the best tool for soft mattes on hair or fine detail. It's better than the other built-in tools, but Fusion really needs a decent new keyer.
Other Options
The good news is that it is possible to construct your own keyer and then save it as a Macro or, if you're good with programming, a Fuse. A Macro is a group of nodes that has been wrapped into a single node, frequently with a customized control panel. A Fuse is a custom node written in the scripting language Lua. Fuses and Macros are not plug-ins, so they work in the free version of Fusion, not just in Fusion Studio. In the Macros chapter, I'll show you how to construct a simple color difference keyer (similar to Keylight for After Effects and Nuke), but in the meantime, check out the Kick Ass Keyer (KAK) by Pieter Van Houte, aka SecondMan on the We Suck Less Forums.
We Suck Less is currently the most useful community of Fusion users I am aware of. They're friendly and enthusiastic, and many of them have been Fusion users for a very long time. They also archived and maintain the old VFXpedia wiki, which was the only source of documentation for Fusion before it was purchased by Blackmagic Design. VFXpedia contains numerous articles, tips, and downloadable tools for Fusion 6 and earlier, most of which work in later versions. Most of the scripts found there will need some updates, but the Macros and Fuses all work fine.
Next time we'll look at Fusion's Paint tools and learn some ways to create clean plates and remove unwanted elements from a clip.
thanks for this. some people say you should degrain/denoise before keying, others that you should avoid doing so, unless you really have to. what do you think? if you have to denoise, do you think the Reduce Noise nodes in Fusion are adequate or does one need to use a third-party denoiser like Neat Video?
I usually degrain prior to pulling the key, then substitute the alpha derived from the degrained image onto the noisy original footage. Grain or noise often creates chaos in the edges that gives away the composite. Ideally you want to smooth that random variation out to get an edge that represents the actual detail. There's a fine line, though, between removing noise and removing detail, and it takes care and practice to strike the balance between the two.
Fusion's built-in Remove Noise is all but worthless, in my opinion. We use Neat Video at Muse, although I don't care much for the most recent version (4.5). The interface is much less responsive than 3.4, which we were using before, and it tints the channels when you're looking at them separately, which I think makes it harder to analyze them. I haven't tried the noise reduction available in Resolve yet.
this clarifies several things a lot! i too have found Remove Noise to be very poor and Neat Video is, for me, very expensive. i have heard that the Resolve noise reduction tool is good, but I don't see how that would work with a Fusion workflow because, as you say, noise removal is a subtle business, and i would think you would have to fine tune the level of noise reduction very carefully rather than do it in Resolve then export as a Connect and then be stuck with whatever you exported. there don't seem to be many other options around, which is very disappointing for something so important.
there is also a tool called Reduce Noise v4 but i have not managed to find a trace of it in the Tool Manual, nor anywhere else, so far. i suspect that because it seems to require a noise print, it won't be susceptible to on-the-fly adjustment.
That's Neat Video. If it's installed in your computer's main OFX folder, it will show up in Fusion as well.
oh! perhaps it comes with Fusion Studio 9.
there is also the Noise Reduction tool in BorisFX's BCC suite: http://web.borisfx.com/helpdocs/?page_id=1019. i have this suite, but i have not tried it yet. i would be most interested to know if anyone has had some good results with it.
I have never tried Boris's noise reduction, but many of the Boris OFX plugins do not work with Fusion. From the description, it may use algorithms similar to Neat, but it doesn't look like it does a Fourier transform to separate the image into frequency bands, which is one of the things that makes Neat so powerful. I think Re:Vision also has a noise reduction plugin that's supposed to be pretty good, but I haven't used that one either.
– i have now installed the BorisFX noise reducer and it seems to work all right in Fusion. certainly much better than RemoveNoise and it has a lot more controls (not hard to achieve, it is true).
– yes, the Reduce Noise v4 is the Neat Video noise reducer, but it is only a demo version (not surprisingly).
– is there a way in fusion (perhaps with neat video?) of getting the noise separated so that it can be added back in later, if so desired as one can in nuke?
Once you've done your denoise, simply subtract the denoised plate from the original plate. The result is the noise alone. I recommend using Custom Tool to do it because on at least one occasion ChannelBooleans' Subtract mode did not produce mathematically perfect results for me. Make sure you do this with floating point images because it will produce negative values, and if you're in int those will get clipped.
Don't forget that you may also need to despill your noise to avoid adding a green cast back into your composite.
thank you! i am about to do simon ubsdell's tutorial on the custom tool (https://www.youtube.com/watch?v=01RZ2m6U7aI), which he also recommends over the Channel Booleans tool (useful though it is) – not least because it is much more versatile.
thanks for the tip about despilling the noise to avoid a possible green cast.
I think Kick Ass Keyer is the beast compared to fusions inbuilt tools.
i also tried ml_additivekeyer its equally impressive along with MT_EdgeBlur. and MT_FastLightWrap✌
This chapter is the one most desperately in need of an update. The addition of DeltaKeyer vastly improved the situation.
My goal with the book is to only describe things that can be accomplished with "vanilla" Fusion, so I've left out references to third-party tools. The revised edition will certainly explain how to install Reactor, although I won't devote any space to describing specific tools available there.