Springboarding from Vito's excellent tutorial Exchange Cameras perfectly using the power of Meta-Data, which uses V-Ray, I developed a similar method for Redshift. Redshift's metadata format differs significantly from V-Ray's. First, it's not in an easily-accessed table format; instead, Redshift writes the transform matrix into a comma-separated list. Second, the rotation order of Redshift's matrix is ZXY instead of XYZ. These two issues prevent us from directly using the method Vito shows. Oh, and there's one further problem: The 3DS Max Redshift plugin doesn't yet write metadata to the image, so this won't work there. I have verified it in both Houdini and Maya, though, and I'm reasonably sure it will also work for Cinema4D. In this article, we'll build a Fuse that reformats the metadata into something easier to apply to a Camera3D node. Take warning, though: There be trig ahead!
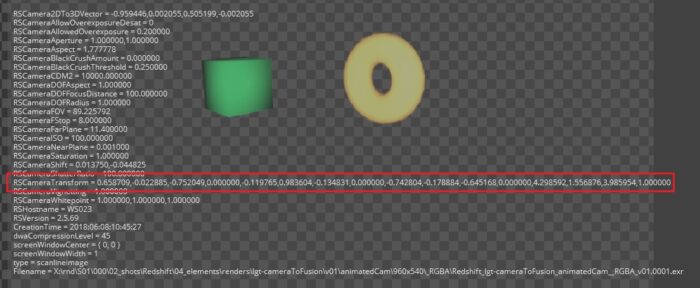
Let's start by taking a look at what we have to work with:
Here we see all of the metadata that Redshift writes into each image it creates. All of this information updates on every frame, so if we can learn to interpret it properly, we can set up a camera that exactly matches the render. I've highlighted the RSCameraTransform matrix, which as you can see is just a list of numbers separated by commas. What we'd like to turn this into is a table of rotation and translation values that can be directly accessed by the Camera3D node.
The initial prototype of this process was created by Andrew Hazelden at the We Suck Less forums. He used an intool script to extract the transformation matrix, calculate the rotations using the same expressions used in the V-Ray method, and then push the results into the camera's transforms. It works, but it's a little janky, and the rotation order was wrong, which Andrew could not have known from the single EXR frame he was given to work on.
I shamelessly ripped off Andrew's code and shoved it into the scooped-out shell of the Copy Metadata Fuse. This isn't intended as a Fuse-writing tutorial (see the Voronoi Fuse article for a reasonable primer), so I'll skip straight to the Process() function. That's where the fun stuff is! (For very small values of 'fun.')
local img = InImage:GetValue(req)

local result = Image({IMG_Like = img, IMG_NoData = req:IsPreCalc()})

-- Crop (with no offset, ie. Copy) handles images having no data, so we don't need to put this within if/then/end

img:Crop(result, {})

local newmetadata = result.Metadata or {}
That's the first few lines of Copy Metadata, which works just fine for our purposes, so I left it entirely alone. It grabs the input image, makes a new output image to match, and creates a table to hold the metadata. If no metadata is present, it just makes an empty table instead.
Lua doesn't implement regular expressions (regex) like most scripting languages, but it does still have a powerful string handling and pattern matching library. The function string.match() searches an input string for a pattern, and returns that pattern to the calling function. For details on pattern matching in Lua, consult the Patterns Tutorial on lua-users.org. Here is Andrew's ridiculous string.match():
m1,m2,m3,m4,m5,m6,m7,m8,m9,m10,m11,m12,m13,m14,m15,m16 = string.match(result.Metadata.RSCameraTransform, "([%w%-%.]+),([%w%-%.]+),([%w%-%.]+),([%w%-%.]+),([%w%-%.]+),([%w%-%.]+),([%w%-%.]+),([%w%-%.]+),([%w%-%.]+),([%w%-%.]+),([%w%-%.]+),([%w%-%.]+),([%w%-%.]+),([%w%-%.]+),([%w%-%.]+),([%w%-%.]+)")
Looks insane, doesn't it? But all it's doing is grabbing each of the 16 entries in the matrix and discarding the commas. There is no indication in the metadata what order these entries go into the table, so it takes a little bit of guessing. Let's take a look at a transform matrix and see what we can learn.
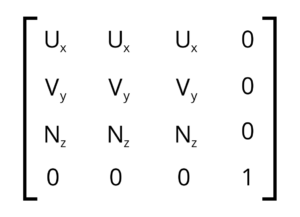 Here we have a "blank" transformation matrix. U, V, and N represent the orientation vectors of the camera. N is the LookAt vector, V is the Up vector, and U is the Right vector. If you have an identity matrix (Ux = 1, Vy = 1, Nz = 1, everything else 0), the camera will be in its default location and orientation. If you're at all familiar with vectors, that should be evident. If you're not, though, don't worry about it—it's parenthetical to what we're doing today.
The right-hand column governs Translation. From top to bottom, Translate X, Translate Y and Translate Z. The bottom row is a sort of anchor for the matrix (it has something to do with projecting coordinate systems—I don't really understand it), and in this kind of transformation it will always be [0 0 0 1]. That means that we can infer what order our values fill up the matrix by seeing where the zeroes fall.
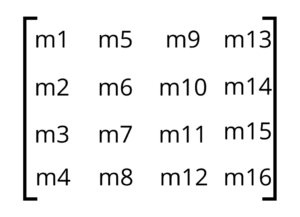 In the image showing the metadata, we see that there are zeroes in the fourth, eighth, and twelfth positions. These correspond to m4, m8, and m12 in the list of variables we pulled out of the list. It looks like we're filling up the matrix like this. —>
Variables m13 – m15 are therefore the Translation values, and we'll add them to newmetadata as a table:
newmetadata.Translate = {}

newmetadata.Translate.X = m13

newmetadata.Translate.Y = m14

newmetadata.Translate.Z = m15
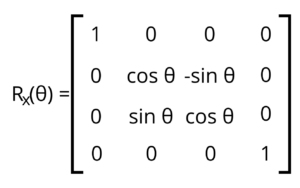
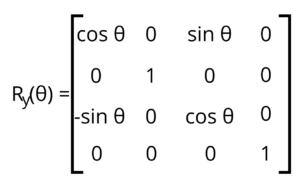
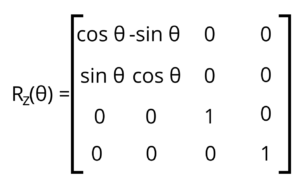
That leaves us with the rotation, which is hard. Let's look at the three matrices necessary to rotate a point around each of the primary axes:
In order to compose all three transformations into a single matrix, they must be multiplied together in a specific order. Unlike Algebraic multiplication, matrix multiplication is not commutative, so the order in which you do it matters. This is where Andrew's original code broke down because he was using V-Ray's XYZ rotation, and Redshift uses ZXY. Another gotcha is that when you're doing this multiplication, you actually do it in reverse order. So we need to multiply Ry * Rx * Rz.
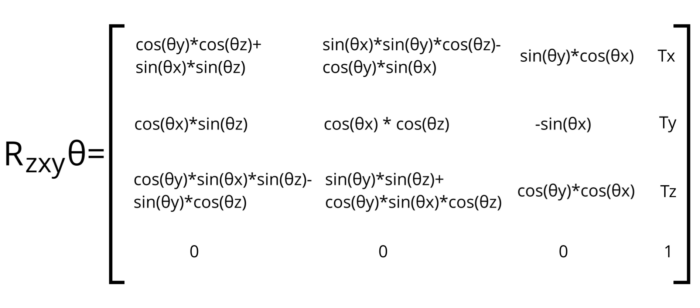
If you remember doing matrix multiplication in your math classes, you're probably howling that you don't want to do it! I hear you. Fortunately for you, as long as you don't need to change the rotation order, the formula will never change, and I've already done the work of multiplying it out for you. Okay, I'll be honest; I used an online calculator in order to prevent myself from making errors. I'm notorious for being unable to read my own notation. Here's the gigantic resulting matrix:
Now we're into a big Algebra/Trigonometry puzzle to reduce this to the three rotations we're after. The process is described by Gregory Slabaugh in his article "Computing Euler angles from a rotation matrix." He was dealing with an XYZ rotation, though, so we can't use his process exactly—the matrix elements are all in different places in our ZXY rotation.
The obvious place to start is with that -sin(θx). As a single-term expression, we can solve it easily:
rx = -math.asin(m10)
Slabaugh points out that asin() will actually have two valid solutions since sin(π – θ) = sin(θ). Lua will only give us one of the two, though, so we can safely ignore the fork Slabaugh writes into his solution.
Knowing that tan = sin/cos, we can get to ry by observing that if we divide m9 by m11, cos(θx) cancels out, leaving sin(θy) / cos(θy). Therefore
ry = atan2(m9, m11)
atan2() is a special variant of atan() that produces a result in the correct quadrant by handling the sign of each operand separately. An ordinary atan() can't tell the difference between y/x and -y/-x.
We get rz the same way, by seeing that m2/m6 = tan(rz), and thus
rz = atan2(m2, m6)
There is, however, a catch: Although the cos(θx) drops out in both cases, the sign of the result still counts. atan2(y,x) is not equal to atan2(-y,-x). We could bifurcate the calculation with an if statement, or we can divide out cos(θx) ourselves, which will cancel out the negative if cos(θx) < 0:
ry = atan2(m9/cos(rx), m11/cos(rx))

rz = atan2(m2/cos(rx), m6/cos(rx))
There is a final problem: what if cos(rx) = 0? In that situation, any term containing cos(θx) zeroes out, and we wind up with ry and rz = atan2(0/0, 0/0). At the same time, we know that sin(θx) = 1. Therefore:
m3 = cos(θy)*sin(θz)-sin(θy)*cos(θz)
m1 = cos(θy)*cos(θz)+sin(θy)*sin(θz)
By the Angle-Sum and Angle-Difference identities:
m3 = sin(θy – θz)
m1 = cos(θy – θz)
and thus:
ry – rz = atan2(m3, m1)
ry = rz + atan2(m3, m1)
This shows that ry and rz are linked. This is what is known as Gimbal lock, and there are an infinite number of solutions. We need only one, though, so we need to set one of the terms arbitrarily. Since camera roll is relatively rare, it's most common to set rz = 0, leaving us with
if cos(rx) == 0 then

rz = 0

ry = atan2(m3, m1)

end
We have now solved all three angles! They're all in radians, though, so the function math.deg() is used to convert them into degrees, which is what Fusion uses in its transforms.
There is one last issue. Redshift's Z axis is inverted, so we need to add 180 degrees to ry, and then we're ready to assign the rotations to the metadata:
newmetadata.Rotate = {}

newmetadata.Rotate.X = math.deg(rx)

newmetadata.Rotate.Y = math.deg(ry) + 180

newmetadata.Rotate.Z = math.deg(rz)
The Aperture and Lens Shift attributes are also in comma-delimited strings, so we can extract their values the same way we did the matrix. There is no need to do complex math on those, though. Finally, we assign newmetadata to the output image and send it out:
result.Metadata = newmetadata
OutImage:Set(req, result)
You can download the Fuse from Reactor. It also comes with a camera Default override with the expressions already set up in Setting 6.
Hi Bryan
Thank for excellent work.
I run into issue of Camera3D.setting in the 'Angle of View' and 'Plane of Focus' (tXYZ, rXYZ working fine)
the code
self.ImageInput.Metadata.RSCameraFOV
self.ImageInput.Metadata.RSCameraDOFFocusDistance
don't seem to find metadata in the image.
my image contain
rs/camera/fov = 24.64699173
rs/camera/DOFFocusDistance = 100
so I try modify the code to
self.ImageInput.Metadata.['rs/camera/fov']
self.ImageInput.Metadata.['rs/camera/DOFFocusDistance']
which didn't work.
Can you help?
Thank you
You have an extra . in the expressions. It should be:
self.ImageInput.Metadata['rs/camera/fov']
self.ImageInput.Metadata['rs/camera/DOFFocusDistance']
Here's a quick Lua lesson so you can understand what's going on. A table is a set of keys and values. The value stored in a table entry can be another table. So let's suppose we have a table called myTable, and it has entries of a = 1, b = 2, and c = 3. If you were to dump the table from a Lua prompt, it would look like this:
myTable = { a = 1, b = 2, c = 3}
You can access the data in two ways: With the dot notation or with a bracketed index. So:
myTable.a = 1
myTable[a] = 1
are equivalent expressions. If you try to call it with myTable.[a], what you're actually asking for is a table with this data:
myTable = { [a] = 1 }
But that won't work in Lua because the brackets are reserved characters. If you tried to get myTable[[a]], Lua would parse it as 'myTablea' because the [[ ]] notation indicates a string literal. It's what would allow you to create a string that contains quotation marks, for instance.
The metadata is stored as a set of nested tables. So self is a table that contains the tool. ImageInput is a subtable of the tool that contains the input, and Metadata is a sub-table of the input that contains the metadata. Redshift's metadata entries are actually malformed. Rather than being subtables, which should look like rs.camera.fov, they used that bad slash notation, which prevents accessing the fields with the dot shorthand. It also prevents the data from being associated, so the fov and focus distance appear, from a programming perspective, to be entirely separate items, even though they should both be entries in the camera category.
I should fix that .setting file, by the way. Redshift changed the metadata format shortly after I made the Extractor. I have an updated Camera default that detects both formats and chooses the correct one. Thanks for the question; I'll try to get that update done soon!
Thank you so much Bryan for the quick lesson and for the answer
by the way. I install Extractor from Reactor
Hi!, for some reason I cannot get the rscamera extractor fuse to work with fusion 16. The node gets red as if there's an error. I checked the .exr metadata and is all there… am I missing something?
Just ran a test, and it works as expected in my install of F16. What error message does the console give you?
Thanks Bryan. I was trying with the version downladed from musefx tools. I now downloaded the last version from wescukless ( https://www.steakunderwater.com/wesuckless/viewtopic.php?t=2248 ), installed all the files and it works as expected. Thank you very much!
We must not have the most recent version up there. I'll let the web admin know. Thanks for the heads up!
In the future, the best way to ensure you're running the latest supported version is to install with Reactor.
Though you'll have to remove the manually installed version, as I am pretty sure the Fuses folder will take precedence over Reactor/deploy/fuses
Hi Bryan, excellent add-ons, thank you!! The camera extractor does not seems to work for me on fusion studio 17.4.3 – the 3D camera remains at the origin and is not getting any animation…Thank you!!
Assuming you downloaded the Extractor from Reactor, all you should need to do is select the Version 6 preset in the top line of the camera tool and feed the Extractor's output to the Camera3D's ImageInput.
Thank you Bryan, issue already solved, it's working nicely! Have a nice day!!