The Glitch Tools macro collection I am working on is, in large part, based on a template for After Effects that we have at work. I am not sure where the template came from, probably VideoHive. In any case, one of the glitches depends on After Effects' Card Wipe transition. That's the kind of thing that Fusion doesn't have right out of the box, but that I think I can reconstruct using the 3d system. Since I have had a number of questions recently about macros and expressions, I thought it might be instructive to document my process on creating this thing.
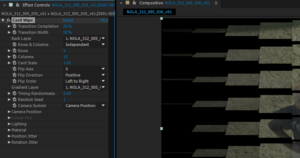
Here I have the Effect Controls panel for After Effects' Card Wipe transition. Just like any other visual effects job, the first step is to look for reference. It's a good idea to know what kinds of controls the original effect has and what they do. I probably won't replicate everything here, at least not for the first version of the macro, but if I have some idea of what AE is doing, I might be able to pick up a few more features along the way than I had originally intended to design. From a little playing with this interface, I see that the most essential pieces for my purposes are going to be the Rows and Columns, Card Scale, and the Flip controls. I'll get most of the camera and shading stuff for free since it's built on a 3d system. The toughest bit is going to be controlling the rotation based on an image—the Gradient flip order. I have an idea, but I have no idea if it will work.
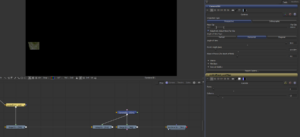 So then, the first thing I want to do is to find a way to dynamically set up the card grid. I'll start with a Shape3D and a Camera3D, and since I'm going to want to eventually put an image on there, I'll go ahead and add the UVMap3D set to Camera mode in order to project my footage from the camera. In my screenshot, you can see my initial flow. I like to use a blank node as a control panel where I put all of my user controls and bring in the main input. It's just a Brightness/Contrast on which I have set the Blend to 0 and hidden all the controls using the User Controls script. This doesn't work in Fusion 8—you can't remove a tool's existing controls.
The control panel goes into a Shape3D set to Plane, then the UVMap3D set to Camera, and naturally a camera from which to project. Then the usual Merge3D and Renderer3D to complete the 3d system. In the camera, I have set the Angle of View Type to Horizontal and the AOV itself to 90. These settings will make it a little easier to figure out my expressions; you'll see why in a little bit. In the camera's 3d Controls tab, I have set Z Offset to 10, again because it makes the math I am about to do slightly easier.
When Will I Ever Need Trig in the Real World?
That's right; trigonometry is about to become relevant to your life!
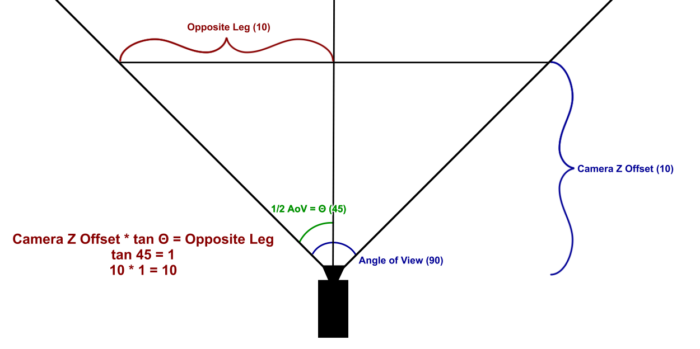
The position of the left-most card is determined by the Angle of View of the camera and its distance from the card. I'll keep the image plane at Z = 0 in order to simplify things. By setting the Angle of View to 90º, I create two right triangles (the AOV divided in half) with an angle of 45º. I know the length of the adjacent side—that's given by the camera's Z Offset of 10. The position of the left edge of the image plane is then the opposite side. To find it, we use the trigonometric function tangent, which is the ratio between the opposite and adjacent sides of the triangle. I chose an AOV of 90 because the tangent of 45º is 1. Therefore, the Z Offset and the Opposite Leg are equal, as shown in the diagram.
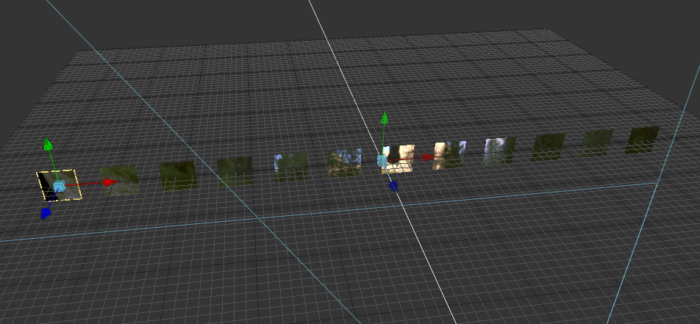
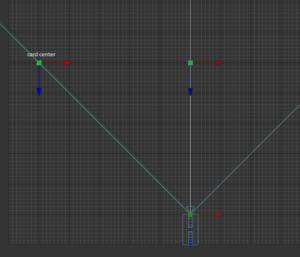 I can quickly set up this situation in Fusion to verify that I am correct, and, indeed, setting the card's X Offset to -10 puts its center right on the edge of the frame.
Having determined that I am thinking about the situation correctly, it is time to create an expression for the card's position so that the user can move the camera and change its AOV but the system will still work.
As we discovered, the information we need is in the camera's controls. Specifically, we need its Z Offset, which is given by Camera3D1.Transform3DOp.Translate.Z, and half of its Angle of View, which is Camera3D1.AOV. Lua's tan() function expects radians rather than degrees, though, so we need to also convert AOV to a radian measure. I won't bore you with a geometry lesson; the formula is degrees*pi/180. So the expression to move the center of the card to the left edge of the field of view is:
tan(Camera3D1.AOV/2 * pi/180) * Camera3D1.Transform3DOp.Translate.Z * -1
I multiplied by -1 in order to move it to the left edge instead of the right edge. It's not strictly necessary, I suppose, but it seems more natural to me to work left-to-right. As I mentioned, this puts the center of the card at the edge, rather than the edge of the card at the edge. The card conveniently knows its own width, so we can add half of that to the expression (or subtract it if you didn't invert the translation):
tan(Camera3D1.AOV*2*pi/180) * Camera3D1.Transform3DOp.Translate.Z * -1 + SurfacePlaneInputs.Width*0.5
Now, no matter what we set the AOV or Translate Z to, the card will stick to the left edge of the screen. The next thing I want to do (I'm just going to go ahead and assume that you do, too) is to make copies of the card and distribute them across the screen. For that, we'll make a Duplicate3D node between the Shape3D and the UVMap3D.
Duplicating the Card
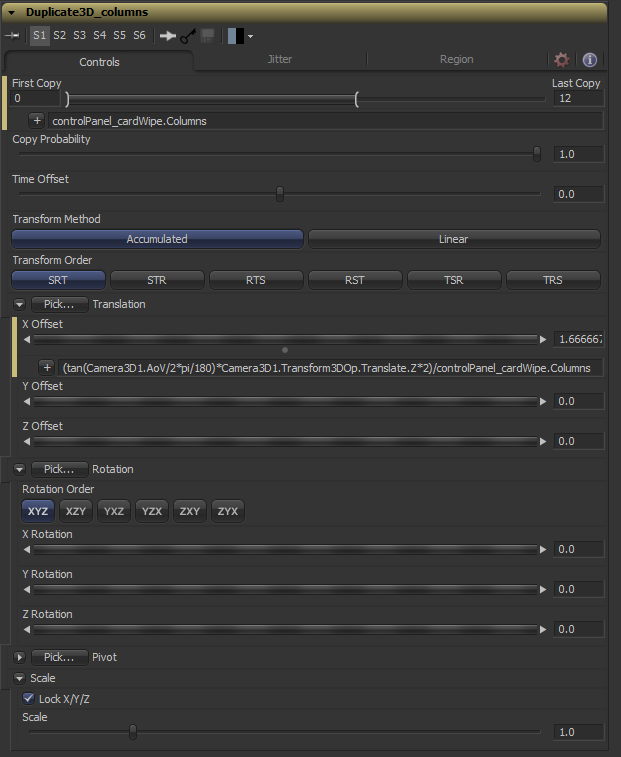
Duplicate is a very powerful tool that makes copies of 3d objects and applies a transformation to each copy. If you've never used it before, take some time to play with its controls and see what it does. In this case, we'll use the X Offset control and the Last Copy end of the range slider at the top to make a number of copies of the card. If you recall, I have that control panel node at the input to which I have added controls for the Rows and Columns. An expression in Last Copy pointing to the control panel's Columns control takes care of that.
The X Offset control takes advantage of the trig we did before. This time, we want the width of the entire AOV, so we'll multiply the Opposite Leg result by two, then we divide the resulting width by the number of copies we want. Here's my Duplicate3D node:
Now the cards are evenly distributed, and we have exactly the number we want, but there's a lot of space between them. We need to modify the width in order to fill the screen properly.
We're really leaning on that tan() function a lot. Here's yet another expression where it would be useful, but each time we call it, we're doing quite a bit of work. Instead of plugging it in yet again, I think it would be valuable to calculate it only once and then reference that result. It will also save a lot of typing! I made a new control in my controlPanel node called iWidth (image plane width) and put the tangent construct there. Then I replaced it in both the Shape3D and the Duplicate3D with controlPanel_cardWipe.iWidth. Much simpler, and Fusion only has to calculate the width once, which saves some processing time.
We could now divide iWidth by columns to get the card's width, but we've actually already done that, so it's quicker to simply point the Width at the Duplicate's X Offset control. Looking back at the AE plugin, I note that there is a Card Scale control. It wasn't part of the essential designs I was going for, but since it's super-duper easy to add at this point, I'll go ahead and do it. I add a Card Scale control on the control panel and multiply the Width by that control. That creates an unexpected problem: Since the card's location is based on its its width, when it is scaled it slides around. Hence, we need to acquire the base width separately from the scale control.
I noodled at this one for a few minutes, coming up with several possibilities, but none of them were particularly elegant. I even started rebuilding part of the flow with an extra Transform3D before I remembered that the Shape3D tool actually has two controls that affect the card's dimensions. In the 3D Controls tab there is a Scale control. Hooking that up to the Card Scale solved the problem. "Super-duper easy," I said…
A Camera Problem
When I started developing this macro, I was using a normal HD image, and my virtual camera's filmback was also set to HD. That footage got archived yesterday, so I substituted a clip from another project that was 2048×1080, and that revealed an issue that I might not have otherwise seen: The rendered output does not necessarily reflect the actual AOV if the aspect ratio of the filmback does not match that of the render. A happy accident to reveal a bug like that.
A good macro should adapt to the input being fed to it. In the Renderer3D's Image tab, I've set expressions on both Width and Height pointing to the controlPanel_cardWipe.Input.Width and .Height. The output of the renderer will therefore always match whatever image is fed in. Whenever I have a macro that generates its own images—Backgrounds, FastNoises, or Renderer3Ds—I do the same so that the tool acts just like any other Fusion tool.
On to the problem, then! In the Camera3D's controls is a twirl-down menu called Film Back, where the dimensions of the camera's virtual sensor can be configured. Since most of our material at Muse VFX comes from the Arri Alexa camera with a 16×9 aspect ratio, I'm going to start by calling up that preset. That gives me dimensions of 0.9370…" x 0.5276…" I ultimately want the ratio of those two numbers to match the ratio of the input's width to height. The actual numbers don't matter as much as the ratio itself, although we'll want to keep them close to those so that depth of field acts as expected (DoF is a function of focal length and sensor size).
I can get the input image's aspect ratio by dividing its width by its height. I set up a user control on the control panel called iAspect for that purpose. Since I have been basing everything on the horizontal angle of view so far, I'll stick with that, holding the filmback width in place and only adjusting its height. Ratios are very easy to solve by simply setting them equal to one another and solving for the missing piece. iAspect = 0.9370078740157/Height. A little bit of algebra rearranges the problem to something we can use: Height = 0.9370078740157/iAspect, rendering the expression for Aperture Height:
0.9370078740157 / controlPanel_cardWipe.iAspect
If only it had been so easy. It turns out I can't set an expression on the Aperture controls. For now, I'm going to set the Resolution Gate Fit to Stretch and let that take care of the issue. I'll also put a new slider called cAspect in my control panel to hold the camera aspect ratio, as I will need that to put the rows in the right place. I'm not sure if iAspect will be useful in the future, so I'll leave it on the panel. It may be that there's a better solution, but I don't think I'm going to find it in any kind of reasonable time span, given that there's so much more work to be done on this thing. Hopefully Fusion 9 will allow an expression on those controls, and this will all become "easy."
Texturing the Card
My original plan when I started this macro was to use a camera projection to assign the texture to the cards, but it turns out that the Duplicate3D creates some difficulties. If I assign the UVs prior to duplicating, each card gets the same UVs, and all I get is one identical small segment of the image on every card. If I assign the UVs after duplicating, the texture slides around on the cards instead of sticking to their surface. In order to solve this problem, I enlisted the aid of my coworker Dan De'Etremont, whose brain is an order of magnitude more effective at this kind of thing than mine is. (I worked on this problem for a day; it took him an hour.)
The objective is to assign a unique UV range to each card while still allowing the Duplicate3D to control the orientation of those UVs. (If you're not familiar with how UVs work, take a look at my exploration of the Texture Tool.) For that, we turn to the CustomVertex tool, right after the Duplicates (that's plural because eventually we'll extend all of this to the Y direction). I have said elsewhere that Fusion's Custom Tools are among my favorite things. They're incredibly powerful, but they can also be incredibly difficult to use. Between the two of us, Dan and I figured that we needed to find a way to assign a unique ID to each card, and the best place to store that ID is in the vertex color. Vertex color is an incredibly useful channel because it doesn't affect the geometry's position or orientation, and it's really not used for anything else. You may recall that it played a part in the soft-skinning process I described in an earlier article. I'll be talking about an "ID space" for a little while, by which I mean a range of colors with values equal to the number of columns and rows. The card in the bottom right has ID [0,0] (red and green vertex channels), and the one in the upper right has ID [columns,rows]. At first, the ID space will be filled by a gradient, but we ultimately want it to have a "stepped" gradient, with each card getting a single solid integer value.
With the expressions we've already made, we know exactly where each card is in world space, so we can spread our ID space out over that area without much difficulty. In the Vertex tab of the CustomVertexTool, spin down the Vertex Color line and replace vcr (Vertex Color Red) with px (Position X). Now the cards' red channel has a gradient with values equal to the point's x location in the 3d world. Our grid is centered on 0, so half of the IDs are now negative. We know the distance between the center and the left edge, though, so by adding that to px, we'll move 0 to where we want it to be. The value of the right-most pixel is now equal to the total width of the area, but we want it to be equal to columns (the value of the last card will be columns-1 since we start from 0, but the value of the entire card will be determined by the brightness at only its left edge). Just as we determined the card width by dividing iWidth*2 by Columns, we can get Columns by dividing iWidth*2 by the card width.
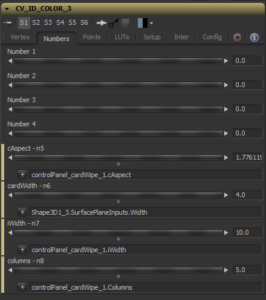
You can't connect the Vertex Expressions directly to an external control, though, which is why the Custom Tools come with all of those empty sliders and point controls. We'll have to link the external controls we want to use to the Number sliders in order to use them. In the Vertex Expressions fields, you can reference these sliders by the alias n1, n2, and so forth.
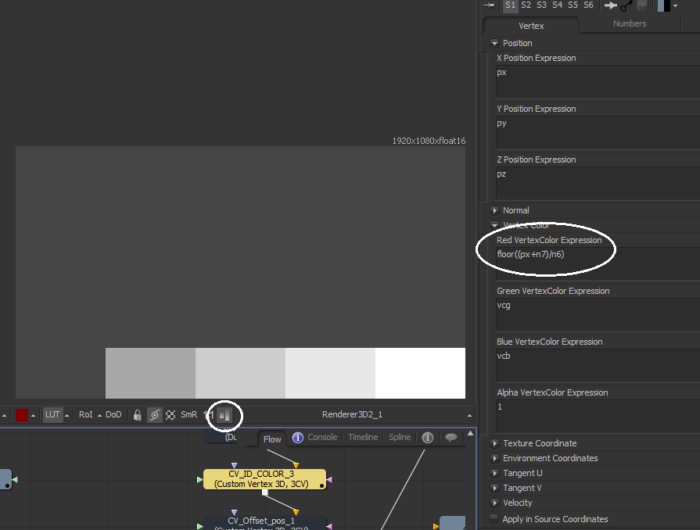
At this point, my expression for Red VertexColor is (px+n7)/n6. The left edge of each card should now carry an integer value. The floor() function can round those values down, giving us this:
I have the normalize button (circled) on so that I can see that each card has its own value. Since these are integer values, viewing it normally would mean that the leftmost card would be black and all the others would be white—too bright to be distinguished from one another on the screen.
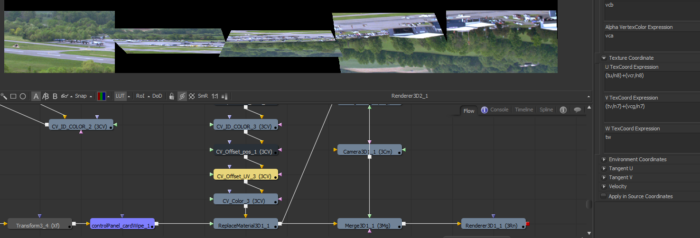
That was the toughest bit to solve. Again, many thanks to Dan for working it out! From here, we want to use each card's default UVs, which run from [0,0] in the lower left to [1,1] in the upper right, and divide them by the card's ID in order to distribute the UVs across the entire grid. We'll make a new CustomVertex node to hold these new expressions. First, we divide U by the number of columns to determine the range that each card should cover: tu/n8. Then we normalize the ID value by dividing it by the number of columns and add that number to the previous one to shift the current card to the right part of the U range: tu/n8 + vcr/n8. The U portion of the UVs have been distributed across the grid, and the cards are almost ready to texture!
There is one more thing we need to do. Fusion multiplies the vertex color by the diffuse value, so we need to set all vertex colors back to white. That's as simple as making a new CustomVertex tool and putting a 1 in all the VertexColor Expressions. Then, a ReplaceMaterial3D node will apply a new texture to the cards, and it's ready to render! By the way, since we're doing this weird world-to-UV mapping, the UVMap3D tool has been obviated.
I cheated a little and did the vertical part of the UV assignment already so that my image would look nice.
Extending to Two Dimensions
From this point on, the job is significantly easier. The difficult parts have been figured out already, and the only sticky bits are figuring out how to manage the aspect ratio. For the most part, that involves dividing widths by cAspect. The Y Offset control in the Shape node, for instance, looks like this:
controlPanel_cardWipe.iWidth*-1/controlPanel_cardWipe.cAspect+0.5*SurfacePlaneInputs.Height
Moving the row off the origin wrecks something in the Duplicate3D's. If you give the X Rotation in the Duplicate a spin now, you'll notice that it's still rotating around the world's origin instead of the center of the card (you might have seen this already if you did a Y Rotation at some point). To fix it, we need to adjust the Pivot of the Duplicate3D to match the new location of the card. That's as simple as pointing an expression at the Offset controls in the Shape3D:
Now the Duplicate will rotate from the center of the card again.
With the first row comfortably located at the bottom of the field of view, we can make a second Duplicate3D to create more rows. It's designed just like the first one, except that it obviously points at the Rows control and it has the same kind of aspect ratio correction in its Y Offset control:
((controlPanel_cardWipe.iWidth*2)/controlPanel_cardWipe.cAspect)/controlPanel_cardWipe.Rows
Proceeding to the ID assignment, the Green VertexColor Expression divides iWidth and Card Width by cAspect:
floor((py+n7/n5)/(n6/n5))
Once again, we have to use the Number controls to pipe this information into the CustomVertex tool. n7 is pointed at iWidth, n6 is Card Width, and n5 is cAspect.
V TexCoord Expression gets
(tv/n4) + (vcg/n4)
n4 is Rows.
Cleaning Up Some Artifacts
 At this point, the functionality of the macro is complete. Putting an image in and looking at the end result, though, it seems that there is some kind of a seam. This happens because the edge vertices in each card overlap. Dan and I did quite a bit of fiddling, adding padding between the cards before assigning the ID, then removing it before applying the texture. It turns out that it vanishes if you set the card's scale to 0.9999, so the vertices are no longer co-located.
You may also have odd edge artifacts, stretching or tearing. This is usually caused by insufficient resolution in the card. I set the cards' resolution to match the image resolution by giving them more expressions: controlPanel_cardWipe.Input.Width / controlPanel_cardWipe.Columns. That ensures that there is a vertex under each pixel, removing any possibility of stretching.
The tool is pretty slow thanks to those CustomVertex nodes. I don't think there's much that can be do to fix that problem short of turning it into a Fuse, though, and I don't have the skills to make that happen yet. Perhaps reducing the resolution of the cards would help. If you need more speed, try multiplying that by 0.25 to see if it makes a difference. You could even make a control for that multiplier and have a quality slider.
Job Done!
In order to match the flexibility of the After Effects transition, some more work needs to be done to create behaviors. Getting that default rippling transition will require some interesting expressions between the Shape3D and Duplicate3D rotations. For the purposes of my Glitch Tool, I think this macro has everything I will need, but I may come back to it in the future to design some of those animations and create a more full-featured control panel.
It also obviously needs to be actually run through the macro creation process and tweaked for usability—I like to rename the inputs and outputs, set up tabs, add common controls, and put an authorship note in the Comments field. There will be more information about that kind of thing the Macros chapter of the book, which should be finished soon.
I hope you enjoyed this walk through my brain as I developed a new macro for Fusion!

This is really nice! I like the effort you put into this, you have essentially created the card wipe plugin in fusion. good job.
Thanks! I enjoyed doing the write-up. I think I'll try to write more of these as I make more tools.