It's tempting when someone starts going on about LUTs and gamma and gamuts to let your eyes just glaze over and then ignore them until they go away. Unless you're one of the nerdiest nerds who loves to talk about bit-rates and logarithmic response curves, you're probably eager to skip all of the color management stuff and jump straight to the Art.
Bad news: You're going to have to learn at least some of the tech stuff if you're going to be a good compositor. You can be an adequate compositor without all of this, but who wants to settle for merely adequate? You don't have to learn it all in one huge bite like I'm giving it to you here. Read through it, but if you don't understand something right now, don't worry about it—you can come back and read pieces of it again once you've got some better context.
The screenshots and specific software instructions here are for Blackmagic Fusion, but the concepts apply to any compositor or image editing program.
Resolution
First let's talk about what a digital image is and how it's constructed (all of this applies to video also, since a video is just a series of images). The most common type of digital image is known a raster image, which is a grid of very tiny dots. These dots are called pixels (short for PICTure ELements). The word raster refers to the grid of dots itself—an effect that is happening outside of the image's boundary can be said to be "off raster." To "rasterize" is to convert a vector image (another type of digital image that we'll deal with later) or effect into a raster image.
The size of a raster, or the number of dots it contains, is commonly referred to as its resolution. There's a good deal of argument among pedants about the correct definition of that term; you will find people who claim that the way I use it here is incorrect. By a strict technical definition, resolution requires two pieces of information: the number of samples (pixels) divided by a measurement of the window in which those samples appear (usually a length, but if you're talking about music it could be a time. 44.1 khz is the resolution of CD-quality music: 44,100 frequency samples per second.) Usually, though, when someone talks about an image or video's resolution, they mean the number of pixels it contains, typically by describing its width by its length. The most common resolutions in film and television production these days are HD (High Definition) at 1920 x 1080 pixels, 2k at 2048 pixels wide, Ultra HD at 3840 x 2160 pixels, and 4k at 4096 pixels wide. 2k and 4k don't have any kind of standardized height because filmmakers are free to change the frame aspect ratio to make their movies fit nicely on a television or make them super widescreen, or anything in between, or even pull the sides back in to 4:3 like a standard definition TV—an IMAX screen is close to this aspect ratio, so it's not as odd as it might seem to those who saw the Synder Cut of Justice League.
Digital still cameras often express resolution in megapixels, which is an absolute measure of the number of dots the camera can capture without regard to aspect ratio (the ratio between the horizontal and vertical measure. Sometimes expressed as a ratio like 16:9 and sometimes as a decimal like 1.77.) A megapixel is 1,000,000 pixels, and the number can be determined by multiplying the image's width and height. So an HD image at 1920 x 1080 = 2 megapixels. The biggest (not so) common feature film resolution out there is 8k, or 8192 x 4608 = 37.7 megapixels.
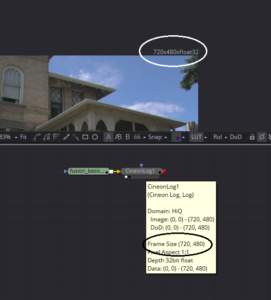 In Fusion you can see the resolution of your image in two places. In the upper right corner of the image in the Viewer, the resolution and bit depth is displayed. If you hover your mouse over any node in the Flow View, the tool-tip that appears will give you quite a bit of information about the image. If you need to force your image to a particular resolution, you can use a Resize node to explicitly set the resolution to your desired values. Remember, though, that changing the size of an image always degrades its quality.
A side note: Some people will insist on specifying the print resolution for an image, such as 300dpi or 72dpi. If the image is never going to be printed, this number is meaningless. It's just a bit of metadata on the file, though, so it doesn't hurt anything to set it if you're in Photoshop. The idea that screen images are 72dpi is a long-standing myth. It was true for one particular Macintosh model back in 1984. The world has moved on, but for some reason that piece of misinformation continues to plague us. If someone makes an issue of it, it's usually not worth the effort to try to correct them.
Channels

We're going to take a slight detour into some color theory here in order to give context for the discussion of channels. Computer images use an additive color model called RGB, which stands for Red, Green and Blue, the primary colors in the model. The RGB model is called additive because when you mix colors together, the result gets brighter. Contrasting with this model is the subtractive color model used in paints and dyes, where mixing together pigments creates a darker color. The primary colors in a subtractive model are Cyan, Magenta, and Yellow. Adding Black ink (necessary because real inks never actually combine perfectly) thus gets you the CMYK model used by most printers.
In the color wheel above, you can see the additive model illustrated. Notice that the subtractive primaries are complementary (straight across the wheel) to the additive primaries, and the colors blend together into white in the center. This property of complementary colors is useful if you ever find yourself wishing to add yellow to an image, but you don't have a yellow control. Since yellow is complementary to blue, you can reduce the blue control, and that will make the image more yellow.
There are other color models, too, such as HSV (Hue, Saturation, Value), YCrCb (Luminance, and two Chrominance channels. Don't ask me how exactly it works), XYZ, and several others. I'm not qualified to talk about most of them, and the specifics are outside the scope of what I want to talk about here, anyway, but be aware that they exist, and you can transfer an image into or out of many of these models using the Color Space node in Fusion.
Now that that's out of the way, let's talk about how this information is used in a digital image.
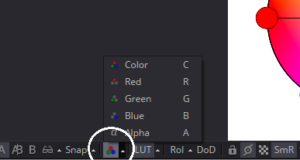 Every pixel in a color image contains a value from 0 – 1 for each of the primary colors. 0 represents no brightness, and 1 is full brightness. These values are called the channels, and you can view them independently as grayscale images by selecting the Viewer and using the R, G, and B keys to toggle between the respective channel and the full color image. You can also use the pop-up channels menu button at the bottom of the Viewer to select the channel you wish to see. When the three channels are mixed together, you get a full color image. The value of an entire pixel is usually given as a triplet like so: 0.5, 0.5, 0.5 is 50% gray. 0.3, 0.6, 0.3 is mint green.
There is frequently a fourth channel available, as you can see from the image. The Alpha channel controls the opacity of the pixel. Pixels with 0 in the Alpha channel are transparent, and pixels with 1 in the Alpha are completely opaque. Usually, the color channels are premultiplied by the Alpha, which means that each color channel's value has been multiplied by the value in the Alpha channel before being displayed. As a result, pixels with 0 Alpha will be black, regardless of the actual values present in the color channels. Pixels with 1 Alpha are unchanged. Pixels with an Alpha between those values will be darkened.
An image that has been multiplied in this way is said to have an associated alpha. Some images might have an unassociated alpha, which is sometimes called unpremultiplied. Yes, this terminology is confusing. To make it just a little bit worse, Fusion uses a variant on these terms, with some switches in the color controls labelled "pre-divide / post-multiply." If you pay attention to what's actually happening with the values, though, you can maintain clarity: To disassociate an alpha from its color channels, you divide RGB by alpha (areas of 0 alpha are ignored in this operation). This creates the "unassociated," "unpremultiplied," or "pre-divided" image. The edges will look pixelated. To reassociate, multiply each RGB value by alpha. The image is now "associated," "premultiplied," or "post-multiplied," depending on who you're asking. The edges will be nicely anti-aliased. If you multiply by alpha again, you will get a dark fringe.
Bit Depth
The amount of storage space allotted to these numbers is determined by the image's bit depth or color depth or, confusingly, color resolution. That's why it doesn't seem worthwhile to get too excited over the definition of resolution—we use it to mean too many different things. Since a computer's native language is binary, bit depths are always expressed as an exponent of 2. A bit is a single BInary digiT, which can have a value of only 0 or 1. An 8-bit channel uses, as you might expect, eight of these bits to store its value. 2^8 = 256, so an 8-bit channel can contain only 256 possible levels. If we double the amount of storage available, we don't simply double those levels to 512. Since it's an exponent of 2, a 16-bit channel can have 2^16 = 65,536 levels. In short, a higher bit depth means much much finer gradations in color.
If we store our images with these simple integers, the values run from 0-255 for 8-bit channels or 0-65,535 for 16-bit. You may have encountered ranges like these in Photoshop or After Effects, which typically display the integer values of the pixels. This makes doing math on the images inconvenient (more about that when I talk about Merges and blend modes!) Fusion and Nuke therefore perform a process called normalization, which remaps the values into that 0 to 1 range we mentioned earlier. Normalization of images is an easy process. Simply divide the pixel's integer value by its maximum possible value. For instance, a 50% gray pixel's value is 128, 128, 128. To normalize it, divide by 255 to get 0.502, 0.502, 0.502, which is as close to 0.5 as an 8-bit integer will get us.
The problem with integer bit depths, even when they're normalized, is that you can't store values below black or above white, and even though 65 thousand levels is quite a lot, it's still a finite quantity, and dramatic color corrections can still potentially destroy some of the color information.
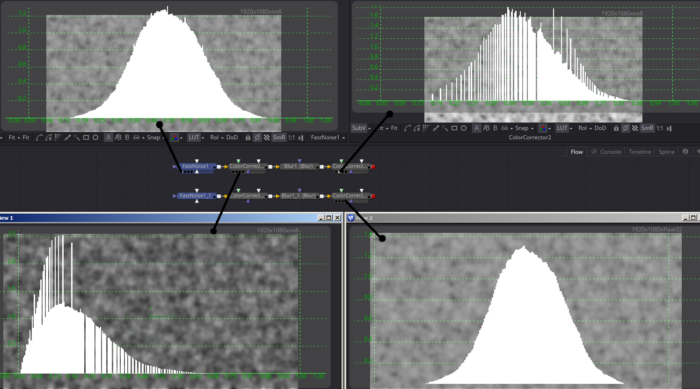
In the image above, I have two Fast Noise nodes. One is set to output 8-bit integer color and the other to 32-bit floating point. The first Color Corrector in each flow reduces the gamma, and the second returns it to its original value. I have indicated with the ugly black lines which Viewer is looking at which node, and if you look at the upper right corner of each Viewer, you can see the bit depth of that image.
The histogram overlay shows the distribution of values in each image—more pixels means a taller line in the graph. The FastNoise produces a nice Gaussian distribution of values. In the lower left, where I reduced the gamma, you can see that the "hump" has been pushed to the left, and it's taken on a comb-like appearance. The tall spikes happen because there aren't enough different values available to hold all those pixels, so some values get doubled up—twice as many pixels as the values right next to them. The empty parts of the graph happen because there weren't enough values to start with to provide a continuous series.
When the gamma is pushed back to 1 by the second Color Correct as shown in the upper right, those gaps and spikes, which represent data that's been destroyed, come along for the ride. Although the overall distribution should now be exactly the same as before, the histogram shows that much information has been lost. The image in the lower right, though, shows the same color transforms happening in floating point space. The final histogram remains solid, with a Gaussian distribution similar to the original (it's exactly the same as its source histogram, but I didn't show the original floating point version).
So what is this floating point thing, anyway, and why is it so much better? A full answer to that is beyond the scope of this book, but the short form is that floating point numbers are a way for a computer to store extremely large ranges of numbers without needing correspondingly huge memory registers. Floating point lets the computer easily use negative numbers (a signed integer sacrifices a bit for the sign, halving the maximum value in exchange for access to negative numbers: -32,767 to +32,768), store a scientific notation exponent for extremely huge numbers, and place a decimal wherever it likes for extremely small numbers. The trade-off is that floating point numbers in a computer may have tiny inaccuracies. 0.0001% is usually the largest deviation you'll see in Fusion. It's not enough to be concerned about usually, but every once in a while you might get better results by adding 0.0001 to a number or reducing a scale by 0.9999, and occasionally an operation that should be mathematically perfect, like subtracting noise from an image then adding it back later, introduces very small (and visually undetectable) errors.
This access to values below 0 and above 1 is important because it lets an image contain data that is outside of the visible range but that might still affect things. A bright sky might appear to be completely white, but a color correction could reveal that the camera captured a nice blue and clouds. This extra detail, even if you do not choose to show it in the final image, can be used in CG reflections or to create an accurate color cast to other elements. It also gives much more flexibility if you decide to do a different color correction later on—an integer image would simply clip that information, leaving you with no choice but to use the white sky.
There are two available floating point bit depths in Fusion: 16- and 32-bit. The default depth is 16-bit float, although as I demonstrated in the histograms above, if 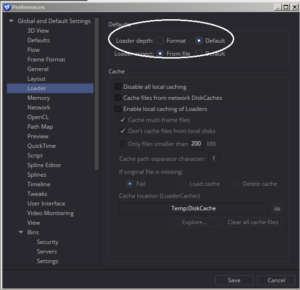 you start with an 8-bit int source, that depth will be carried into the comp. The image will always take its color depth from the Background, and doing all your compositing on an 8-bit source image is not ideal. The simplest solution is to change your preferences so that Loaders always switch to the Default depth instead of keeping the Format depth. The Default depth itself can be set in the Frame Format section. Generally speaking, 16-bit float is sufficient. You can force an image into 32-bit as needed with a Change Depth node. I usually only find that I need 32-bit accuracy if I am dealing with motion vectors (a pair of channels that describe how far a given pixel will move in the next frame in the x- and y- screen directions), ST maps (a pair of channels that describe a lens undistortion) or a z-depth channel (shows the distance of a pixel from the camera). I talk more about these special utility channels in the chapter on CG integration.
There is one other common color depth you will run into: 10-bit integer. This is the storage format for some extended-range cameras and the Digital Photo eXchange (DPX) format. 10-bit color allows significantly more latitude, typically in the brightest parts of the image, allowing storage of a wider range of values and permitting more control in post-production over the look of the final image, even if it will ultimately be displayed only in 8-bit. Fusion will not work in 10-bit mode, so a Loader with a DPX will be converted to 16-bit int if the Preferences do not tell it to do otherwise. Likewise, a Saver set to DPX will automatically convert 16- or 32-bit color to 10-bit, although this conversion can be overridden in the Format tab. DPX can also hold 12-bit color, but it is not common.
One final piece of confusion before we close up this section. Most of the time, when someone talks about the color depth of an image, they're referring to the depth per channel. 32bpc means "32 bits per channel." Occasionally, though, someone will describe an image as "32 bits per pixel," or 32bpp. That means that there are four 8-bit channels (RGB and Alpha), making it the same as what can also be called an 8-bit per channel image. And an 8-bit per pixel image is one with paletted color, meaning that the file header contains a table of 256 pre-selected colors, and every pixel must use one of those colors. GIF and some PNG files use that bit-depth, which is why GIFs made from photos always look horrid—there aren't enough colors to create a pleasant image.
So if a client asks for 32-bit deliverables, you may need to clarify what exactly they want since there are two formats that will fit that description.
Color Space, Gamma and Gamut
A digital image is not usually stored with a physically-accurate luminance response.(luminance is the brightness component of an image, as opposed to the chrominance, or color component) That is, while in the real world twice as many lights produce twice as many photons to hit a camera's sensor, when the camera stores the information, it doesn't simply record the number of photons that hit a particular sensor site. Instead, it allots more of its dynamic range (the difference between the brightest and darkest things the camera can record accurately at the same time) to the brightness range where the human eye is most sensitive—the mid- to dark-toned areas.
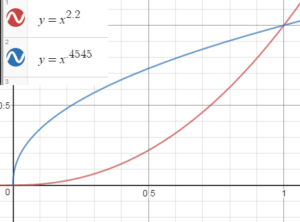
This remapping of values is performed by applying a gamma curve. The image is brightened by raising every pixel's value to the power of .4545. When it is displayed, the operation is reversed by raising every value to the power of 2.2. In this image, you can see the two curves produced by the gamma operation. This is something of a simplification, and even when computers were using this system, not all of them agreed on the preferred gamma settings. For a long time, Macintosh screens used a gamma of 1.8 to better match a particular line of laser printers, while Windows computers always assumed 2.2. These days, the common sRGB color space that your monitor is probably using has a curve close to 2.2 (we usually refer only to the expansion gamma—the curve required to display the image), but not quite, and each channel gets a slightly different curve.
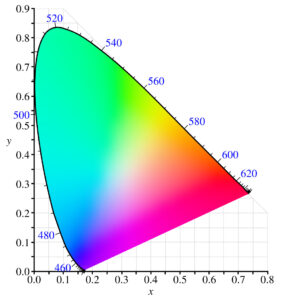
There are a couple of additional related terms to talk about now. A transfer function is that set of curves that describe how luminance is mapped to code values, or the numeric representation of the color. Gamut is the collection of all colors that a color space is capable of describing. It also refers to all of the colors a specific device is capable of displaying or capturing. It is described by listing its primary coordinates, or primaries. White point is the coordinates within the gamut space that represents white. Those last two are a bit hard to explain without a confusing graph:
This is the CIE 1935 chromaticity diagram. It's not that important to really understand it, but it makes describing white points and gamuts a little easier. Around the outer edge of the horseshoe shape, the wavelength of various colors of light is given, from red at 620nm all the way around to violet at 460. This is all plotted on an X/Y graph, allowing you to convert any spatial coordinate into a color in the spectrum.
If you pick three spots on the diagram that you want to call Red, Green, and Blue, they'll form a triangle. The colors inside that triangle are the gamut of the image—any color in the gamut can be described by setting a value on the RGB channels. The coordinates of those three points are the primaries of the color space. Then draw a line from each primary through the approximate center of the diagram, such that all three lines intersect at one point. This is the white point. It may not actually be white in the diagram, but it will be treated as white in the color space.
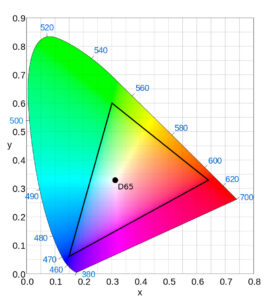 Here we have a diagram of the Rec.709 color space, which is the standard for HDTV. It's also frequently used for UHD, even though that's supposed to use a newer specification called Rec.2020.
The complete color space is made up of those three things: Transfer function (gamma), gamut, and white point.
A color model is a mathematical model of color, as discussed earlier. RGB and HSV (hue, saturation, value) are color models, while sRGB and rec.709 are color spaces. In practice, "color space" is frequently used to refer to both concepts. Not every color that can be described by the RGB color model can be created on a screen, so the gamut remaps the numbers from the model into values that can actually be displayed. Printing and projection gamuts are even more limiting. Let's go through a few different color spaces you are likely to encounter on the job:
sRGB: The most common image color space, consumer quality computer monitors use sRGB. If you have a jpeg, tga, or png image, or a video intended to be shown on the Internet, it's probably sRGB.
Rec.709: Also known as BT.709, this is the color space specified for HDTV. Most HD video cameras store their images in Rec.709 for best display on television screens. Stock video is very likely in Rec.709.
sRGB and Rec.709 have the same primaries and white points but different transfer functions.
Rec.2020: An update to 709, Rec.2020 has a much wider gamut and makes High Dynamic Range (HDR) images possible. HDR expands the luminance range of a display device, allowing it to show a bit more of the superwhite information that usually gets clipped.
Linear Light: Ideally, images for compositing should be linearized—that is, any transfer function has been removed. OpenEXR images are usually assumed to be linear. I'll go into more details about the linear workflow when I talk about CG integration. Note that linearizing the image does not remove its gamut or white point, so it is still important to make note of those. A linear image is sometimes called scene referred, meaning that its code values describe real-world luminosity rather than the luminance of phosphors on a screen (display referred).
Log: There are several different logarithmic conversion curves. The "standard" is the Cineon log curve, which is used to approximate film density. Most cinema cameras have their own curves, so you might encounter ARRI LogC, Panalog, REDLog, or Sony S-log, among others.
ACES: An attempt to create a universal color space, ACES is a complex topic that I definitely don't have time to go into here (assuming I understand it properly, which I'm not confident of). ACES is actually several color spaces, each with its own purpose. They all have a gigantic gamut, are mostly linear (ACEScc has a small non-linearity near the black point that makes color correction easier), and have one of two standard white points.
Images are converted into and out of these spaces using Look Up Tables (LUT). The LUT is usually applied right before displaying the image in order to make it match the gamut of the viewing device. Sometimes you will also get a LUT or a Color Decision List (CDL) from the client that modifies the image according to what the colorist or cinematographer has done so that you can view the image as they intended. This second LUT may or may not translate the image into sRGB or rec.709 for your monitor. It is therefore possible to have chained color transformations. For instance, you might have a LUT to turn the linear data to rec.709, then a CDL to apply the colorist's work, followed by a Viewer LUT to turn rec.709 into sRGB for correct display on your computer monitor.
File Formats and Compression
Finally, let's talk about the different types of images you can use in your compositing. The primary difference between most image and video formats is the method and amount of compression used. Compression is used to reduce the size of a file for storage and transmission. In the section on color depth, I talked about how many bits are used to store a pixel's information. If you have, for instance, an RGBA image with 8 bits per channel, it requires 32 bits per pixel. An HD image (1920×1080 pixels) has 2,073,600 pixels, and therefore requires over 66 million bits to store. That translates to 8.3 megabytes (MB) for one HD frame. Now consider if you're working on a television program running at 24 frames per second. Assuming a 43-minute show, storing the entire thing requires 513 gigabytes (GB)! My largest hard disk is 8 terabytes (TB), so I'd be able to store only 16 episodes of that show on a single disk. Compression reduces this enormous amount of data to save both space and time, sometimes at the cost of quality. A Blu-Ray disc is only 50 GB, but it can hold four or more episodes of The Flash.
In broad strokes, there are two types of compression: lossless, in which the original pixels can be recovered with mathematical perfection, and lossy, in which some data is discarded, usually in such a way as to be visually undetectable. Lossless compression usually works by finding duplicated information and replacing it with a smaller block of data. There is a hard lower limit on how small a file can go with lossless compression. Lossy compression analyzes the image, determines what pieces of information the viewer is unlikely to notice changes to, and deletes them permanently. Repeated recompression with a lossy format will very quickly degrade the quality of the image. Generally speaking, you should try to use uncompressed or lossless compression for working images, saving the lossy compression for final output. Of course, the limitations of your storage and transfer infrastructure may make that impractical, so try not to recompress if you can avoid it.
Let's go through a few different file types and examine the advantages and disadvantages of each:
JPEG: The acronym stands for Joint Photographic Experts Group, and the file extension can be either .jpg or .jpeg. Jpegs are the most common image format found on the Internet, and they are best for photographs. Jpeg uses lossy compression with a variable quality control. Sometimes the control goes from 1-12 and sometimes it is a percentage. Usually 80% quality or better is visually indistinguishable from the original. Jpeg works very well on noisy images, but large expanses of flat color and high contrast edges, such as text, will show artifacts. Compressing too much will reduce the number of colors, creating banding in gradients. Jpeg cannot carry an alpha channel, and it is limited to 8 bits per channel.
JPEG-2000 is an update to the jpeg specification that adds some additional features, including alpha channels, high bit depths, and an option for lossless compression. It is used in Digital Cinema Packages (DCP), a common format used for digital theater projectors. It is technically superior to jpeg in every way, but it currently has limited compatibility with existing image viewers.
GIF: The Graphics Interchange Format is an 8-bit per pixel format (256 total colors) that can assign one of its colors (only one) to be transparent and can also be animated. It uses lossless compression that works by finding horizontal blocks of repeating colors and replacing them with one pixel and a code for the number of repeats. Due to its very limited color depth, GIF is unsuitable for most purposes and is mostly obsolete, except for its use in Internet memes.
PNG: The Portable Network Graphics file type is a substantial upgrade to GIF. Png uses a lossless compression method similar to GIF, but it works vertically as well as horizontally, more than doubling its effectiveness. It has two variants: Png-8 is an 8-bit per pixel image similar to a GIF, but more than one transparent color can be designated, allowing for translucency (partial transparency). Png-24 is 8 bits per channel (24 bits per pixel), and can additionally carry an alpha channel (for another 8 bits, making each pixel 32 bits, but it's still called png-24). Most png's are of the png-24 variety. Png-8 is rare since the file size savings are insignificant compared to the disadvantages.
PNG is an unassociated alpha format, which means that the color channels have not been multiplied by the alpha. In most software, this multiplication happens upon import. Fusion does not make that assumption and leaves it to the artist to determine whether and when to associate the alpha. Note that this property means that PNG cannot be used for glows or other emissive effects because those elements use RGB over 0 alpha, and the colors will therefore be destroyed upon import. When exporting PNG from Fusion, it's a good idea to put an AlphaDivide right before the Saver in order to avoid doubling the association that may happen on import or display.
PNG is also slow to both encode and decode, particularly in Fusion, so it's difficult to use it as a video source. I can't recommend using it for your working files.
Targa: With a typical file extension of .tga, targa is a very old but still useful file format. It can use lossless compression, but it usually works better uncompressed. It is an 8-bit per channel format that can carry an alpha. Its greatest advantage is that almost everything can read it. Targa is therefore popular for textures in 3d software and may even be used as a final delivery format if 8-bit color is acceptable.
TIFF: Tagged Interchange File Format. Tiff files are extremely versatile, with many features. Unfortunately, this flexibility comes at a cost of compatibility. A tiff created in one system may not be readable on another. Tiffs can use color depths from 8 bits to 32 bits per channel, either integer or float, and can carry an arbitrary number of channels (including alpha). PSD (PhotoShop Document) is a variant of TIFF that uses the extra channels to hold its layers.
DPX/Cin: The Cineon file format was created to hold the logarithmic color film scans from a process called telecine. It was eventually replaced by DPX, which added a few more features. It's fairly unlikely that you'll encounter a Cineon file, but DPX is very common. These are uncompressed and typically have 10 bits per channel (30 bits per pixel). Although a DPX with an alpha channel is unusual, it is permitted in the specification. A DPX file will almost always be in log color.
OpenEXR: A file format developed by Industrial Light and Magic (ILM) specifically for visual effects, OpenEXR usually holds 16-bit float data, but it can also hold 32-bit float. The usual assumption is that EXR files are linear, but you shouldn't take that as a given—not every CG artist understands linear workflow, so it is not impossible that you might receive EXRs encoded with the sRGB gamut. Like tiff, EXR can contain an arbitrary number of channels. Nuke is set up to handle these channels easily, but Fusion has some idiosyncrasies when it comes to the extra channels. It can also have multiple 'parts,' which can be loaded from disk independently as though they were separate files. There will be more information about that in the CG integration chapter.
EXR supports several varieties of compression, both lossless and lossy, and it can even compress individual channels with different algorithms and have channels with different bit depths.
Quicktime: Video files with a .mov extension are Apple Quicktime. Quicktime is not actually a format, but a "wrapper" that can contain one of dozens of different compression schemes, called codecs. Some codecs compress individual frames just like jpeg or png (spatially). Others can compress information temporally by identifying information that doesn't change from frame-to-frame and replacing the repeated pixels with smaller codes. Still others attempt to estimate the apparent motion of the pixels and reduce the file's size by generating motion vectors for large blocks of pixels (block-based motion estimation). I don't have the time to go through all of the options for QT codecs, but here are some you're most likely to encounter: H.264 is a lossy codec common for Internet video and Blu-Ray discs. Various types of Apple ProRes are typical intermediate and deliverable formats. ProRes is also lossy, but it can often be recompressed at least two or three times without any visible quality loss. DNxHD is a competing codec created by Avid, which makes editing software. Some varieties of ProRes and DNxHD can carry alpha, others cannot.
Avi: The Windows equivalent to Quicktime is the Avi wrapper. It is functionally identical to Quicktime, capable of using most of the same codecs (with the notable exception of ProRes). It is not at all common in professional work, but it does crop up occasionally.
Radiance/HDR: A special case format, Radiance is designed to hold High Dynamic Range images (HDRi). An HDRi (sometimes just HDR) can represent a much wider range of brightness values than a normal image, which are captured by making several exposures simultaneously with different shutter speeds. As such, they are usually only stills, but some recent video cameras have begun capturing HDR images. In visual effects, an HDRi is most often a panoramic image (360 degrees field of view) that can be used as a light source for CG objects. This topic will come up again in the chapter on 3D compositing, but in the meantime, I cannot do otherwise than to recommend my friend Christian Bloch's excellent book on the subject, the HDRI Handbook 2.0.
There are many, many more formats out there, not to mention all the different video codecs. Treating the topic properly would require a book of its own (a very dry book, far worse than this overly long article).
Just a heads up, Fusion doesn't concatenate color operations, so the blur in the histogram example isn't needed.
Really? I thought it did. Thanks for the heads up; I'll make a revision. And I'll also start being more careful with my color operations.