This is an unfinished draft of one of the appendices to the unfinished draft of the book. I don't remember how far I got, but I believe everything currently stated in here is at least true, if perhaps not complete.
Now children, when a Foreground and a Background love each other very much, the Foreground inverts its Alpha channel and multiplies it by the Background. Then they add their color channels together and a new composite image is born.
You can take your compositing skills up a notch with a thorough understanding of the math behind Fusion's Merge and Channel Booleans tools. This article explains the various Operations available in the Channel Booleans node and the Apply Modes available in the Merge.
First, a brief recap of channels and alphas. Each pixel of a color image in Fusion has at least four values: Red, Green, Blue and Alpha. The three color channels mix together to form every color a screen can display. The Alpha channel controls how opaque the pixel is—if the image is put on top of a background image, it determines how much of the background shows through.
An alpha channel can be associated (many people use the confusing term premultiplied. We'll get to that in a moment). Or it can be unassociated (sometimes known as straight alpha) with the RGB channels. An associated alpha is one that has been multiplied by the value of the RGB channels to reduce the brightness of the pixels where the alpha is not completely solid (having a value of 1, or white if you're looking at the channel on its own). An unassociated Alpha has not been multiplied in this fashion. Generally speaking, Fusion expects associated alpha (you'll typically see the term post-multiply in Fusion, which usually means the same thing as pre-multiply but represents a difference in where the math is occurring—before or after an operation), but I want to look at an image with an unassociated Alpha first.
The Over Equation
Let's start with a look at the most common compositing operation: The Merge Over.
Here is the formula to put one image Over another using an unassociated Alpha channel:
C = Cbg * (1-Afg) + Cfg * Afg
A = Abg * (1-Afg) + Afg
The subscripts fg and bg indicate either foreground or background values, C represents the Color channels (all three channels R, G and B get the same treatment) and A is the Alpha channel's value.
The formula for the color channels is called a weighted average or linear interpolation (LERP). It is sometimes also called a mix. The weighting variable, in this case the Alpha, is multiplied by one term and it's inverse is multiplied by the other. The Alpha determines the percentage of each input pixel that winds up in the output. For instance, if Afg is 0.75, then 1-Afg is 0.25. 75% of the Foreground is added to 25% of the Background. Fusion can be instructed to use this method by sliding the "Subtractive – Additive" control to 0.
If the alpha has been associated, then the Foreground has already been multiplied by the Alpha. The Over formula for an associated alpha is therefore simpler:
Cbg * (1-Afg) + Cfg
This is the equation Fusion will use when the Subtractive – Additive slider is at its default value of 1. Setting the slider somewhere in between will interpolate between these two equations. I have tried to reverse-engineer this slider, and this is the formula I came up with (s is the value of the Subtractive – Additive control):
Cbg * (1-Afg) + Cfg * Afg * (1-S) + Cfg * s
Common Merge Problems
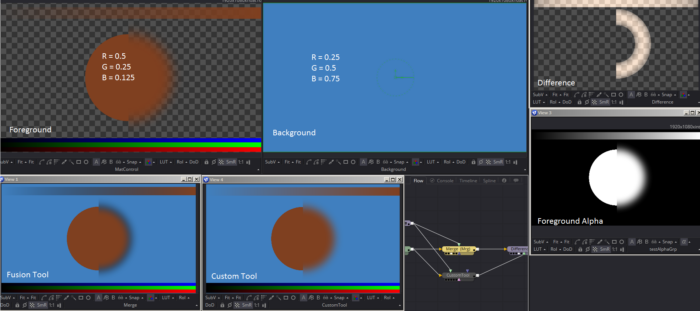
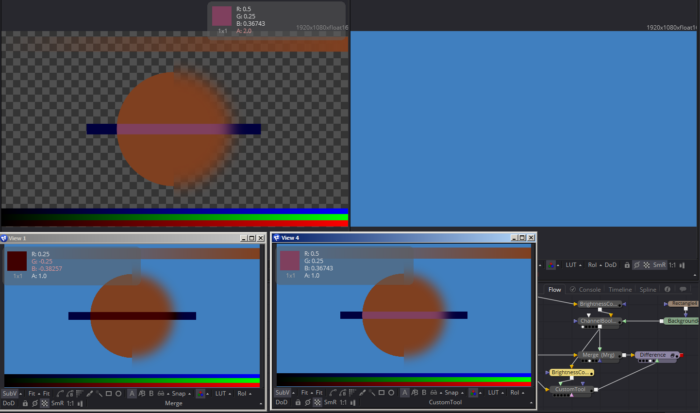
This is my testing environment, which currently shows the difference between the Merge set to Subtractive mode and my CustomTool set to Additive mode handling a foreground with a premultiplied alpha. As you can see, the foreground's pixels are transparent when the alpha is black, and with the correct setting in the custom tool, the merge looks good. The Merge tool's subtractive setting, though, means that the colors are being multiplied by the alpha twice: Once by the association process and again by the subtractive Merge mode. This results in a dark halo where the alpha designates semi-transparent pixels. It is impossible to see it at this scale (and very difficult even at 100%), but anti-aliasing creates the halo even around the parts of the circle with a hard matte.
In the upper right, I am running a Boolean in Difference mode (more about that later), which shows where the two images are not the same. The brighter the pixel, the more different the values are. Now let's look at the opposite problem—an unassociated alpha in both modes:
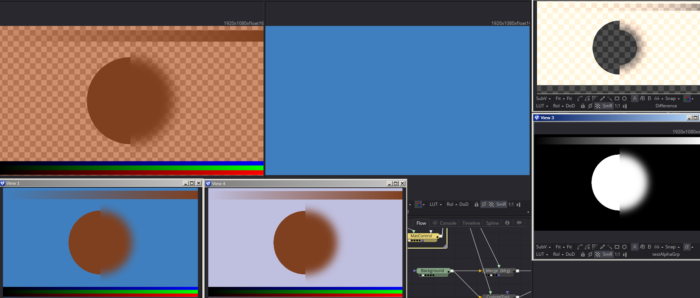
In this image, the orange pixels have not been knocked out of the transparent areas of the foreground, so when the Additive merge is performed in my CustomTool, the background gets brighter. It also desaturates because the foreground and background colors are complementary to one another, pushing the combined color toward white. Fusion's Merge, on the other hand, is still in Subtractive mode, so that composite looks correct.
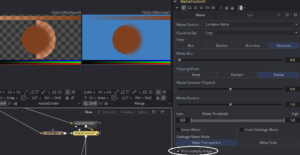 That dark halo from the first image shows what happens when the foreground is premultiplied twice. Using the Subtractive mode is not the only way to make that happen, though. You can also add an extra multiply using the "Post multiply image" switch in a Matte Control tool. If you need to replace or modify the alpha of an image, make sure you use an AlphaDivide node before making your changes, then an AlphaMultiply when you're done. That will preserve the luminance in the matte edges.
Here we see the results of an Alpha that has been driven above 1.0. I have used a Channel Booleans node to Add a blue bar with an Alpha of 1.0 to the Foreground. Where the bar crosses the existing Alpha, the value rises to 2.0, and when the Merge does its arithmetic, strange things happen. I have turned on the Color Inspector SubView so you can see the resulting values.
In the lower left, the Merge was performed with the overdriven Alpha. Both the Green and Blue channels now have negative values. In the lower right, I have clamped the Alpha such that no value can go above 1, and the composite looks the way you would expect it to.
Various other problems can result from channels that go above 1 or below 0. I won't demonstrate all of them here, but if you find yourself with unexpected results from a Merge, remember to check the incoming channel values and trace them back node-by-node until you find the operation that created the problem pixels.
Of course, if you need your results fast, you can use a Brightness/Contrast node and activate the Clamp White and Clamp Black switches, which will chop off any out-of-range values. Just watch out that you don't lose valuable detail in those super-white areas.
Merging Lights: The Alpha Gain and Burn In Controls
A compositor is frequently called upon to add lights and sparks and specular highlights to an image. When you do that sort of thing, you usually want to simply add the light's pixels to the existing pixels rather than darkening either one like a Merge usually does. You can use the Channel Booleans tool I showed in the previous section to perform an add operation, or you can use a normal Merge tool and adjust the Alpha Gain control.
Alpha Gain is a multiplier on the Foreground's Alpha channel. When it is reduced to 0, so is the Foreground's Alpha channel, making the Merge formula simple addition for the Color channels:
Cbg * (1-Afg*0) + Cfg
1-0 = 1, so Cbg is unchanged. If the Merge is set to Subtractive mode, though, Cfg * A * 0 = 0, no matter what the Alpha and Color values are. In that case, it does the same thing as the Blend control.
Burn In does much the same thing, except that it only affects the Background side of the equation, so it works as an Add in Subtractive mode. However, in Additive mode, it causes both Alphas to be added together as well, usually resulting in an output Alpha above 1. To summarize: Use Alpha Gain in Additive mode and Burn In in Subtractive mode to reduce the influence of the Foreground's Alpha.
After Effects users may be accustomed to using the Screen blend mode for Merging lights. I'll address the math behind Screen and why it shouldn't be used for that purpose in the section on Blend modes.
Blend: A Master Switch
Almost every tool in Fusion has a Blend control. The Nuke equivalent is Mix, and After Effects has Opacity. The Blend is simply a multiplier on the Foreground side of the equation. All four Foreground channels are multiplied by the Blend control's value. This can, by the way, be used to overdrive a Merge. If you have an element with very low Alpha values—smoke, for instance—turning Blend up to 2 or 3 can make that element denser. It is also useful for making Merged lights even brighter.
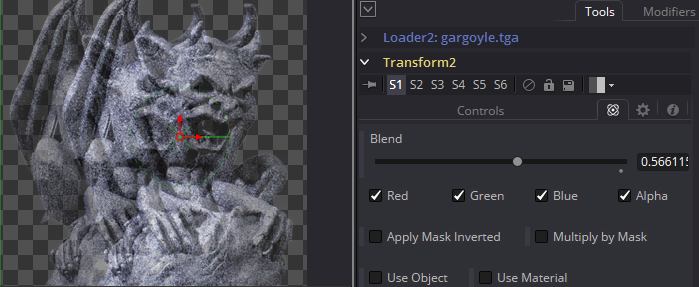
On tools other than a Merge, the Blend control mixes the unchanged input with the modified output. Reducing Blend on a Transform will not reduce the distance the image has been moved. Instead, it creates a cross-fade between the input and the output, giving you a double image.
Apply/Blend Modes and Boolean Operations
I am going to branch out a little from just the Merge node here to also include modes from the Channel Booleans tool, as they have similar functions. Let's start with those Booleans because most of them are simpler. There is some overlap with Merge, and I will point them out as they come up. I recommend also reading the descriptions of each mode in the Fusion Tool Reference. The most up-to-date reference should be in the Help or Documents folder of your Fusion install folder, but you can also find it on-line here:
https://documents.blackmagicdesign.com/UserManuals/Fusion9_Tool_Reference.pdf
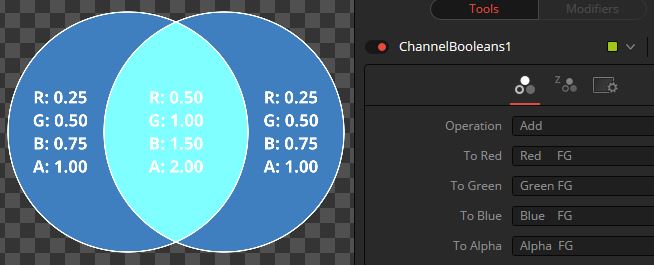
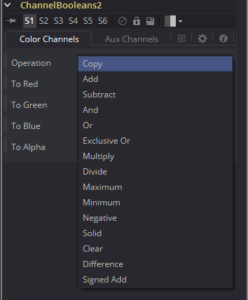 The Channel Booleans tool uses one Operation, which is used to combine Background channels with available channels from either Foreground or Background. In the image, you can see the full list of available Operations. For the purposes of talking about this tool, we'll designate the Background as BG, the Foreground as FG, the channel from which pixels are taken as the Source (which may be taken from any channel in the FG or BG or be a constant defined by the tool—white, black or mid gray), and the Output image as Output.
I have created a standard set-up with two overlapping circles, each having RGBA values of (0.25, 0.5, 0.75, 1.0), and the Channel Booleans tool performs its operation on each channel. There is a Probe modifier that queries the Output color in three locations: The left side is the BG circle, the center is where they intersect, and the right side is the FG circle.
The image on the left shows the result of a Merge and the relationship between the two circles. The one on the right shows the result of a Copy operation, described below. In the future, I will only show the result side of the image—the incoming FG and BG remain unchanged.
Channel Booleans Operations
Copy
Copy replaces the channel. You can use this mode to Copy the Alpha Background channel into all of the other channels, or to move the Z Depth channel into one or all of the Color channels, or copy an Alpha from one image to another. The formula for this mode is simply:
Output = Source
In the above image, the BG circle has vanished, leaving only the FG circle. Usually you wouldn't Copy all four channels—you would use the Copy to inject one or two channels from another image.
Add
The next mode in the list is Add. We covered this one pretty well in the Merge section. The formula, of course, is:
BG + Source = Output
Remember to set the Alpha to "Do Nothing" in order to avoid problems later in the flow! In this image, I have not done so, and the Alpha in the intersection is 2.
Subtract
As you might expect, the Subtract mode subtracts the Source from the Background:
BG – Source = Output
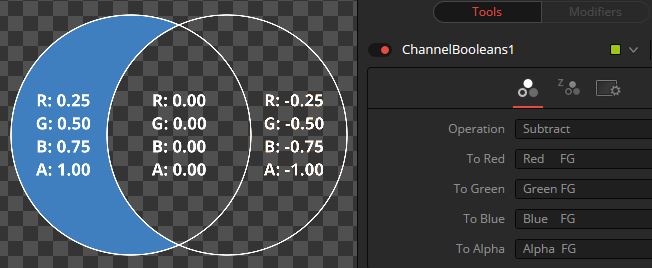
Here we see that since the two images have identical values, where they overlap all four channels are 0. In the area where the FG didn't exist (RGBA all 0), the results are all negative. The Viewer cannot display negative pixels, of course, but if you were to Merge this image over a background, they would be revealed. Subtract can be a dangerous mode that produces unpredictable results. Either use it very carefully or follow it with a Brightness/Contrast to clip the blacks.
Subtract is useful sometimes to extract grain and noise from an image so that it can be re-added at the end of composite. Put your original plate in the BG and the denoised plate in the FG. The Output is the noise. This must be done in floating-point mode, though, because if the resulting negative pixels are clipped then the result of adding them back at the end of the composite will be incorrect.
AND / Multiply
Boolean math (named for its inventor George Boole) is intended to work only with binary values—1 and 0, or True and False. In Boolean algebra, an AND statement only comes out True when both operands are also True. So…
1 AND 1 = 1
1 AND 0 = 0
0 AND 1 = 0
0 AND 0 = 0.
The AND operator, in practice, is identical to Multiplication.
1 * 1 = 1
1 * 0 = 0
0 * 1 = 0
0 * 0 = 0
Theoretically, AND can only be applied to these binary values, but Fusion permits AND to be used on any number, so for all practical purposes AND and Multiply are the same:
BG * Source = Output
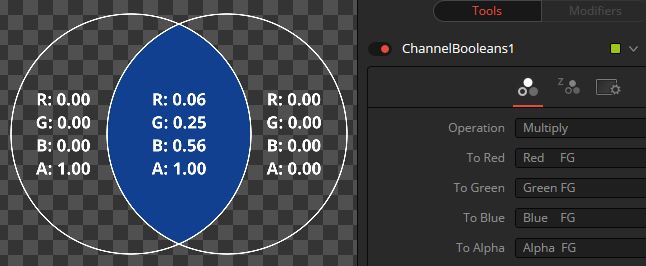
In Photoshop Multiply always confused me due to the integer value display. Multiplication makes numbers larger, so why did 128 * 128 give 63? It turns out that Photoshop normalizes its integer values to the 0-1 range behind the scenes, so Multiply makes things darker. Fusion shows the normalized values, making it much easier to understand what's going on. Multiplying by 1 (white) leaves the value unchanged. Multiplying by 0 (black) makes the Output black. Anything in between darkens the Output proportionately. This makes Multiply the ideal mode for placing black-and-white drawings into an image.
Another use for AND or Multiply is to create an intersection between two mattes. For instance, you have a plate with a character casting a shadow on a greenscreen. The background has a window, so you only want to see the shadow on the wall, not in the window. If you have a matte for the wall, you can Multiply it by the matte for the shadow and use the resulting intersected matte to color correct the wall. The color correction only happens where both the shadow AND the wall exist.
Multiply is also available in the Merge node, but it operates differently—see the Apply Modes section below for details. AND is also available in the Matte Control node.
OR
The second Boolean logic operator, OR returns a value of 1 if either input is 1.
1 OR 1 = 1
1 OR 0 = 1
0 OR 1 = 1
0 OR 0 = 0
When working with non-binary numbers, the formula is a bit more complex than AND's:
BG + Source – BG * Source = Output
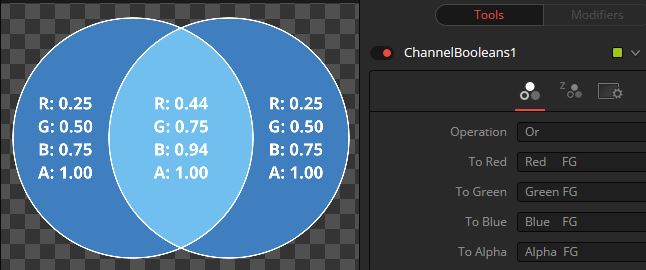
Combining two channels with OR gives a non-linear progression. 0.1 OR 0.1 = 0.19 is just a tiny bit dimmer than 0.1 + 0.1 = 0.2. But 0.5 OR 0.5 = 0.75 is quite a bit dimmer than 0.5 + 0.5 = 1.0. The rate of change is fast where the sum of the operands is near 0 and slows the higher the sum gets. If the sum goes above 2, the result is reversed, reaching 0 when the sum is 4 and continuing to fall into the negatives faster and faster as the sum of the operands rises.
OR is useful to combine multiple mattes into one. Where either matte exists on the inputs, it will exist in the output. Unlike with an Add, the intersecting parts of the alpha will never go above 1, and they usually blend smoothly together. OR can create a "blobby" appearance where masks intersect, though, since the combined feathered edges are brighter than either edge alone would be. If you run into that problem, try Maximum instead.
Exclusive Or (XOR)
Similar to an OR, the Exclusive Or only outputs True when the inputs are different:
1 XOR 1 = 0
1 XOR 0 = 1
0 XOR 1 = 1
0 XOR 0 = 0
As far as I am aware, there is no accepted simple arithmetic formula for XOR. Fusion is doing something when combining non-binary values with the operator, though, so it's worthwhile to try to divine what it is. The formula I have derived is this:
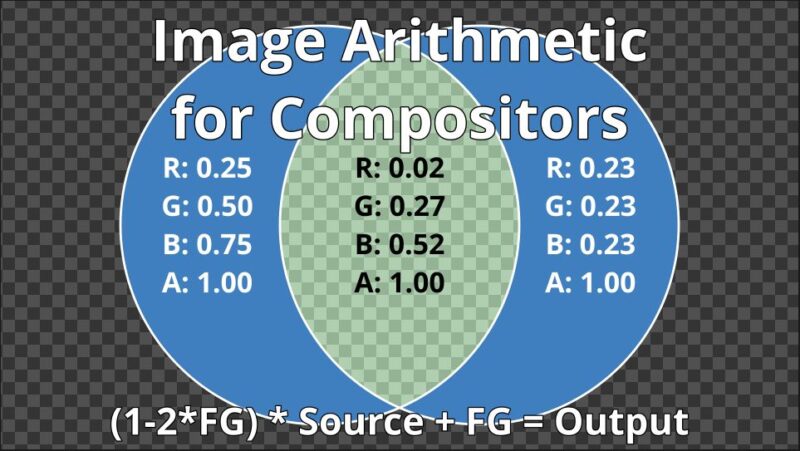
(1-2*FG) * Source + FG = Output
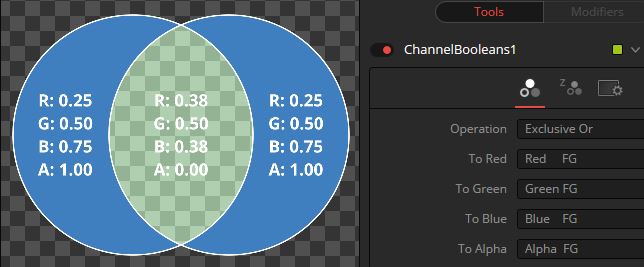
As you can see from the image, having identical non-binary values returns a non-zero Output, which doesn't accord with the logical concept of XOR. The FG acts as a range from its own value to 1-FG, and the other selects the percentage of that range on which the Output falls. For instance, if FG is 0.25 (0+0.25) and Source is 0, the Output is 0.25 (0 percent of the range from 0.25 to 0.75). As Source rises to 1, Output approaches 0.75 (100% of the range). It doesn't actually matter which input is which. The formula works exactly the same if you swap FG and Source.
I find it difficult to intuit what OR and XOR are going to do for non-binary images, so I use them sparingly.
Divide
Divide is another simple arithmetic operation:
FG / Source = Output
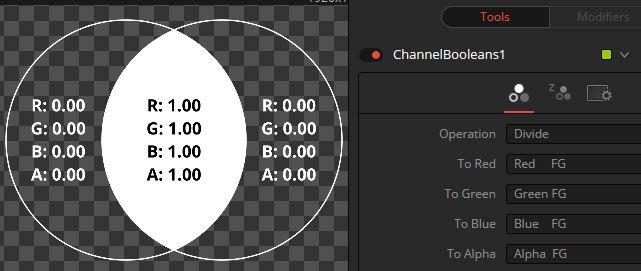
There's a catch, though. As any fifth-grader can tell you, you cannot divide by 0, but we certainly don't want Fusion to crash every time we try. I couldn't say for certain exactly what Fusion is doing "under the hood," but at a guess I'd say there is a conditional statement to the effect of "If Source is equal to 0, set Output to 0." That seems to be the behavior, anyway.
Divide is a mode that is seldom used, but when that rare case comes up that needs it, it can be very powerful. The most common use is to disassociate an alpha (unpremultiply), but there is an AlphaDivide node that does that more easily.
Maximum
The Maximum mode chooses whichever value is highest and passes that to the Output. There is not a formula for Maximum—instead, it is calculated with some programming logic that looks like this:
If FG > Source then Output = FG else Output = Source
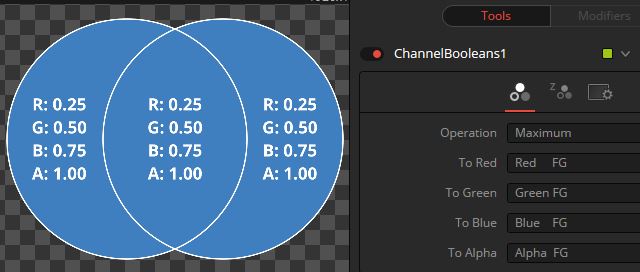
Maximum is very useful for combining mattes where you don't want the combined alpha to go any higher than the highest of the input mattes. Unlike OR, it won't create filleted intersections. On the other hand, it can't be used to build up thicker areas using multiple low-density mattes because the end result will never be greater than the densest input.
Minimum
The opposite of Maximum, Minimum returns the smallest of the two inputs:
If FG < Source then Output = FG else Output = Source
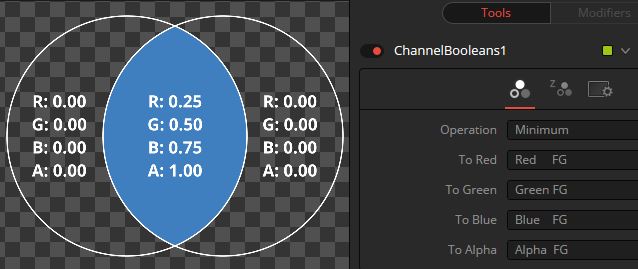
Minimum is used in a similar fashion to AND and Multiply—it creates and intersection of two channels, but unlike Multiply, it will not create a color that is darker than both the inputs. Like Maximum, this quality makes it suitable for intersecting mattes while easily controlling the minimum opacity of the result.
Negative
This mode, in my opinion, really shouldn't be in the Channel Booleans tool because it only acts on the Foreground input:
1 – FG = Output
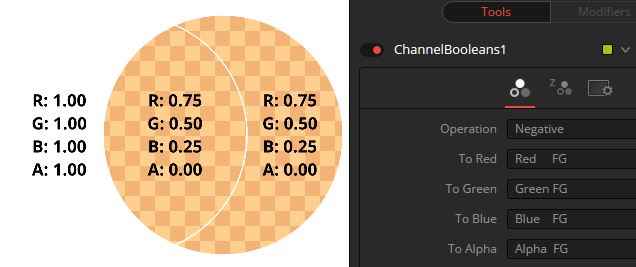
Unless there isn't a Foreground attached, in which case it does the same thing to the Background. Confusing, no?
For a long time, I was puzzled why Fusion didn't have an Invert node. It's very easy to make, and it's very useful. It turned out to have been hidden in the ChannelBooleans tool the entire time.
Solid
The Solid mode simply gives the Output channel a value of 1.0. It doesn't care about the value of either input; it just makes things white. I suppose since I have given formulae for all the other modes, I'll keep it up here:
1 = Output
There's really no point in taking a screenshot of a pure white image, though, so I'll save the server space!
Clear
Like Solid, Clear mode doesn't refer to the input values. It makes them all 0:
0 = Output
And like Solid, providing a screenshot of a black rectangle is senseless.
Clear is a handy method to mask an image without use of a Merge or some complicated premultiplication trick. Put a matte in the Mask Input for the Channel Booleans, and set it to Clear; the pixels inside the matte become 0.
Difference
Difference mode is similar to Subtract, but it returns the absolute value of the result:
|FG – Source| = Output
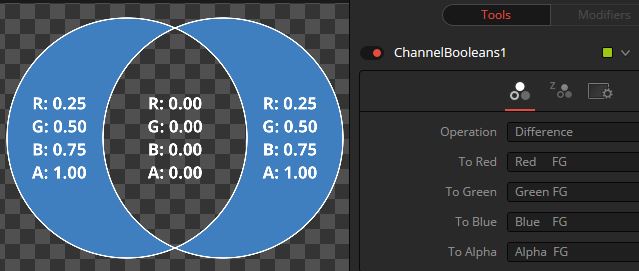
This mode, which also exists in the Merge, can be used to compare two images. Wherever they are the same, the output is black, and the more dissimilar they are, the brighter the result.
Difference mode is a useful utility tool, but it is seldom used in an actual composite. It can be used to line up a clean plate over footage, making it easier to accurately warp things into place. It can also be used to verify the integrity of a composite—showing that only the pixels that were supposed to be changed are different from the original plate. In the Keying chapter, I'll talk about using the Difference mode to create a difference matte and why it is usually of dubious value.
Signed Add
The last mode available in the Channel Booleans tool is Signed Add. The formula is:
BG + Source – 0.5 = Output
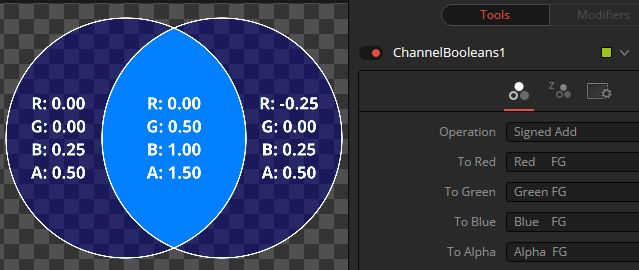
If one of the inputs has a value of 0.5, the other is passed to the Output unchanged. Pixels that are above 0.5 are added and pixels below 0.5 are subtracted. This is a variation on the Overlay mode found in the Merge tool (described below) that is stronger in effect and permitted to go outside the boundary of 0 – 1.
Merge Apply Modes
Unlike Channel Booleans, Merge affects the Alpha channel differently than the color channels. In most of these modes, the Alpha is treated just like it is for a Normal Apply Mode.
Normal
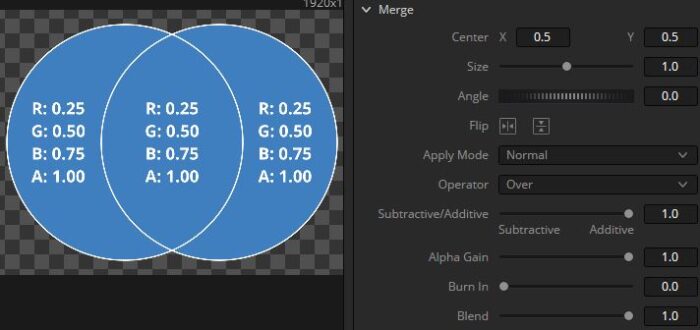
We went over the Normal Apply Mode ad nauseum at the beginning of this chapter, so there is little sense in rehashing it here. But for the sake of having a base image for comparisons, here is what it looks like.
Screen
Functionally, Screen works a bit like the reverse of a Multiply. Any Source pixel with a value of 0 has no effect, and pixels with a value greater than 0 lighten the Output. Here's the formula for the color channels:
1 – (1-Cfg*Gain) * (1-Cbg) = Output
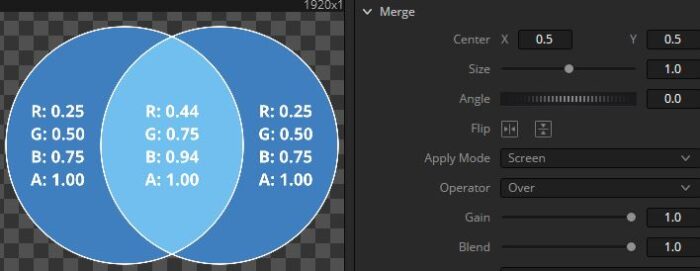
Both images are inverted, then multiplied, and the result is inverted again. Assuming the values of both images stay in the 0 – 1 range, this ensures that the Output also remains in that range. The Gain control is a multiplier on the FG, causing it to act just like the Blend control.
After Effects and Photoshop users are used to using the Screen mode to add lights to an image because if you're using integer values an add will cause clipping—pixels have their maximum value limited to 1, causing a loss of detail. With Screen mode, that detail is preserved at the cost of making it more difficult to actually reach 1.
With floating point numbers, though, values above 1 are permitted, and when you're dealing with that situation, a strictly-calculated Screen starts behaving oddly. For instance, suppose you have two super-white lights with value 2.0. With an Add, the combined lights have a value of 4.0—twice as many photons reaching the camera means twice as much brightness. In Screen mode, though (ignoring the Gain control):
1 – (1-2) * (1-2) = 0
Fortunately, Fusion doesn't permit that kind of craziness, but it still does not produce accurate results. Once either input goes above 1, Fusion's Screen mode switches to the equivalent of Maximum. The above scenario results in an output of 2. Screen remains available for use with integer values, but I cannot recommend it if you are working in float.
Dissolve
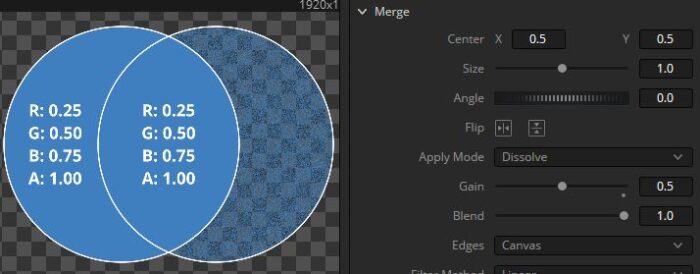
Dissolve works a bit differently than most of the Apply modes, so I have adjusted the demonstration to better illustrate it. There is no formula for Dissolve, or at least not one that is useful to know. The Foreground is multiplied by a static noise field (static meaning that it doesn't change from frame to frame), and the Gain slider controls how strong the effect is. At a Gain of 1, it looks just like a Merge. At a Gain of 0, the FG is invisible. In between, you get a pattern like the one shown.
Multiply
Multiply in the Merge node works differently than it does in Channel Booleans. The operation occurs only where the Foreground's Alpha is not zero, leaving Background pixels outside that area alone. The formula for the color channels is this:
Cbg * (1-Afg) + Cbg * Cfg * Gain
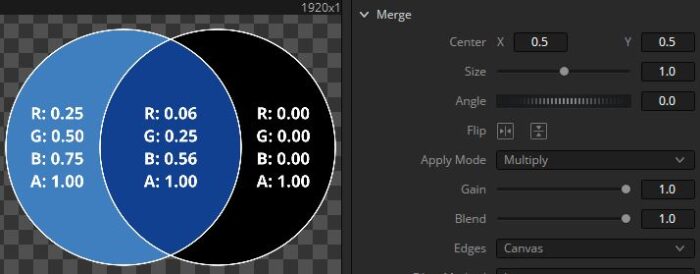
Although the math is a little more complex, this version of the Multiply behaves a little bit more intuitively for most purposes.
Overlay
Overlay works similarly to Signed Add, except that it multiplies if the Background pixels are below 0.5 and screens if they are above 0.5. At least, that's what the manual says, but my test suggests that's not exactly true.
I haven't derived the formula for this one. There is some interaction with the Foreground Alpha that I can't quite put my finger on. As the Alpha approaches 0, the behavior becomes closer to a Signed Add, but the Foreground color values are still halved. When the Alpha reaches 0, the blend suddenly turns off, switching the channel to the unmodified Background Color.
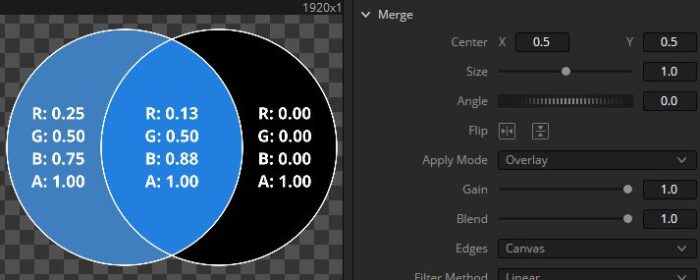
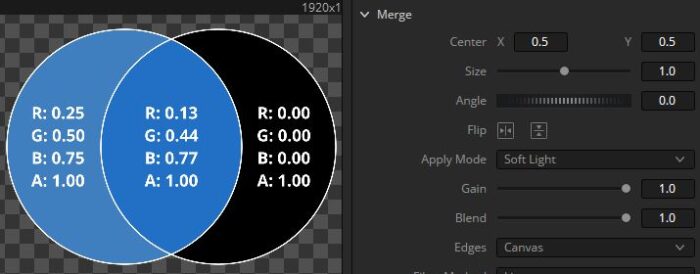
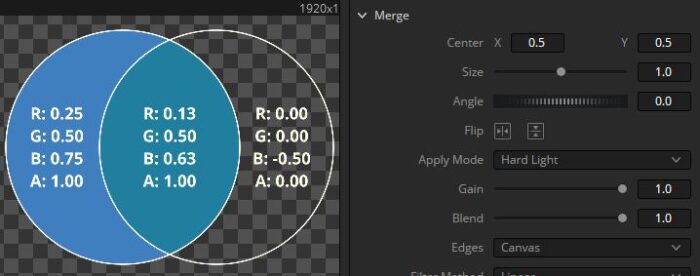
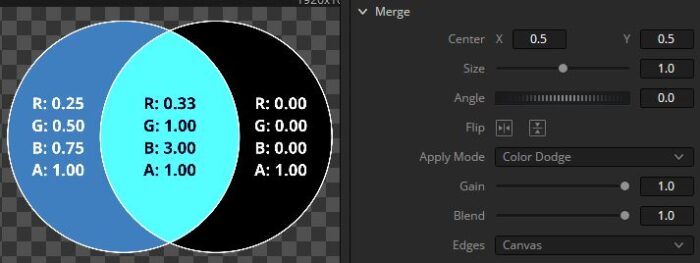
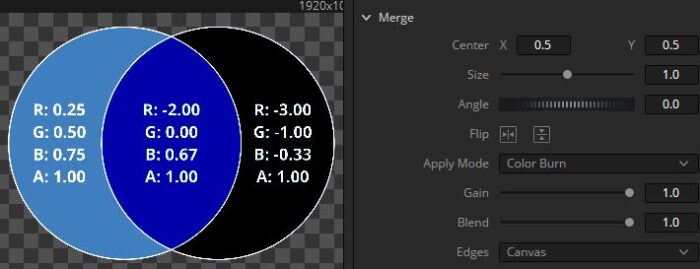
I haven't yet done the work to derive the formulae for the remaining blend modes, but I've been holding on to this thing long enough—at least the work I've done so far should be free.
Soft Light
Hard Light
Color Dodge
Color Burn
Darken
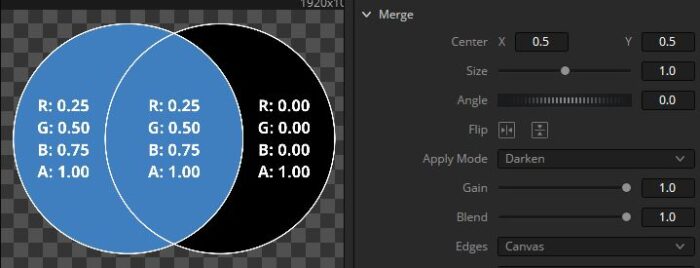
Darken is the same as the Min operation in the Channel Booleans, except that it only operates inside the FG alpha. Since the FG and BG colors are the same in the test image, the center pixels don't change.
Lighten
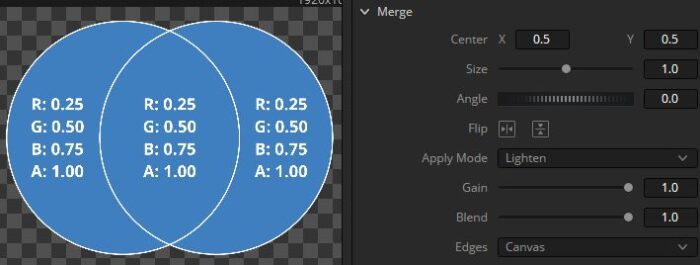
Like Darken, the test image isn't ideal to show how it works, but Lighten is the same as the Channel Booleans Max operation, except, it only works inside the FG alpha.
Difference
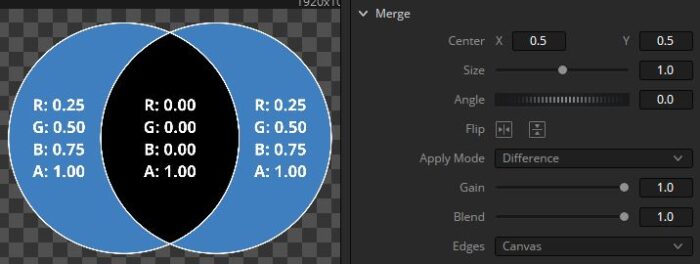
Again, the Difference mode is the same as the Channel Booleans: Pixels that are the same turn black, and the greater the difference between the FG and BG, the brighter the pixel gets.
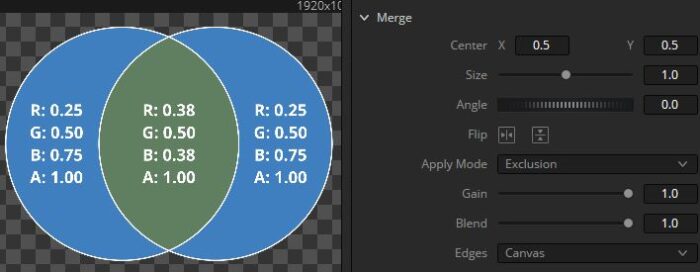
Exclusion
Seems to be the same as the Exclusive OR (XOR) in Channel Booleans.
Hue
Hue mode preserves the luminance and saturation of the BG but uses the hue of the FG. I'm really not sure how that works mathematically; I suspect it might be operating in HSV space. In this example, I've used a Color Corrector to rotate the Hue of the FG by 0.5 (180 degrees). The left-most portion of the image shows the new FG.

Saturation
According to the Tool Reference, Saturation mode is supposed to use the luminance and hue of the BG and the saturation of the FG, but my test doesn't support that. It seems to still take hue from the FG.

Color
Uses the luminance of the BG with the hue and saturation of the FG. This one seems to work as advertised.

Luminosity
Uses the hue and saturation of the BG and the luminance of the FG. That description seems to be correct.


Hi Bryan,
Thank you for the great article, it's exactly what I was hoping for. Your explanations of the formulas and overall logic is super clear. On the blend modes section, there are some images not showing (B_Merge-Math_010.png to B_Merge-Math_039.png), are they missing within article or could the issue be within my browsers? I've tried on both Chrome and Firefox and they don't appear.
Another question is why doesn't the article show up at the top of the blog? … [couple minutes of tinkering] Okay, got the date sorted out. It was way down in 2017 for some reason.
I see all of the images on my end in Chrome, and checking from my work computer shows them, also. It's possible that the date weirdness was causing problems. Try giving it a Ctrl+F5 refresh to ensure you don't have broken images cached.
wonderful resource. I was reading the Fusion manual and it does not do a thorough job of explaining the math behind some operations, especially the "AND" operation.
Fusion 19 manual only says "And: Perform a logical AND on the color values from color channel to color channel. The foreground image generally removes bits from the color channel of the background image."
Your article here is much, much better to better understand how things are working.