My buddy Vito asked for some help with combining normal maps with bump maps in Fusion. He’s been using a method that’s pretty common but mathematically flawed: Apply the bump to the base normals using Overlay mode. While this Looks About Right most of the time, he wanted to improve his workflow. To be honest, the problem was a little bit over my head, but being unable to resist the technical challenge, I dove in.
After some Googling around and reading descriptions that sent my brain spinning, I finally happened across a blog post courtesy of Stephen Hill that shows several different methods, compares their results, and even includes a little WebGL demo of each technique. As soon as phrases like “shortest arc quaternion” pop up, though, I totally lose track of what’s going on. One of these days my maths will catch up with what I’m trying to do, and I’ll understand what’s going on there. In the meantime, though, the blog very handily provides some code, and that is something I can break down into a tool!
Here’s the HLSL provided by Hill:
float3 t = tex2D(texBase, uv).xyz*float3( 2, 2, 2) + float3(-1, -1, 0);

float3 u = tex2D(texDetail, uv).xyz*float3(-2, -2, 2) + float3( 1, 1, -1);

float3 r = t*dot(t, u)/t.z - u;

return r*0.5 + 0.5;
The trick for me is to turn this into Fusion tools. So let’s try to break it apart into its components.
The variable t is created by multiplying the x, y and z normals by 2. Then 1.0 is subtracted from x and y. z is left alone.
u is based on the bump map—the microdetails that we’re adding to the overall normal map. x and y normals are multiplied by -2 (inverting and scaling at the same time), and then we add 1 to bring them into the -1 to +1 range, just like the main normals. z is only scaled and normalized, not inverted.
r is where the confusing work gets done. We multiply t by the dot product of t and u, then divide by the geometry’s z normal and finally subtract u. The end result is given by the return line, which returns the result to a normalized range.
So how does that translate into Fusion tools?
First, we need to adjust an inconsistency in the way Fusion handles normal maps. If you get a normals buffer from the OpenGL renderer, it will already be in the -1 to +1 range for the x and y channels, and z goes from 0 to 1. Technically, z would go all the way to -1, but by definition those polygons are pointed away from the camera and will not be rendered. In fact, even 0.0 is invalid for the z normals since we’d be looking edge-on at a polygon with no thickness. In contrast to this, a normal map created by the Create Bump Map node never produces negative values—it is always normalized from 0 to 1. Hence, the geometry normals and the bump normals are not in the same format and need to be unified before applying Hill’s algorithm.
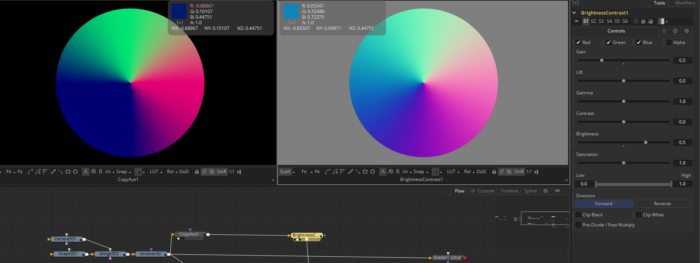
Since Hill is starting from [0,1], I’ll transform the geometry normals to conform to that first:
This is a render of a 3d cone from overhead, which is the same setup Hill uses in his demos, so we can more easily see if we’re getting similar results from Fusion as he gets from GL shading. Since it’s much easier to perform color transformations on RGB channels, I’m using a CopyAux tool to move the Normals channels into RGB. If you are using the free version of Fusion 9, you won’t have the CopyAux tool, so you’ll need to instead use a ChannelBooleans to Copy the Normals XY and Z BG channels to RGB.
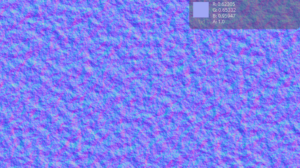
 To this cone, we’ll add this noise map, created with Fusion’s FastNoise tool. As you can see, the bump map is already normalized, and it generates only RGB values, so we’re starting from the same base circumstances as Hill’s demo.
The next step is to create t. For this, I’ll use two BrightnessContrast tools. One of them will handle Red and Green, and the other will handle Blue. The output of the CopyAux goes into the BC tools, and since each tool doesn’t touch the channel(s) operated on by the other, they can just be put in series instead of having to juggle the outputs through Booleans. Doing this actually puts us right back where we started in Red and Green, but we’ve added 1.0 to the Blue channel. Ultimately, you could save yourself some calculation by just giving Blue a Brightness of +1.0.
Next we need to create u. From the output of the Create Bump Map node, we add a BrightnessContrast and untick the Blue channel. This one gets a Gain value of -2.0 and a Brightness of +1.0. It might be unexpected for Fusion to even accept a negative Gain value, but all Gain does is provide a multiplier for a pixel value. Multiplying by -1 then adding 1 is yet another way to perform an Invert operation. A second ChannelBoolean with Red and Green unticked gets a Gain of 2 and Brightness -1.
Now we use t and u to create r. We can’t do a dot product with typical Fusion nodes, so we’ll need to reach for the wondrous Custom Tool. There is also not a dot() function in Lua, so we’ll have to do it longhand. The dot product of two vectors (x1, y1, z1) and (x2, y2, z2) is the sum of the products of their components:
x1 * x2 + y1 * y2 + z1 * z2
We’re taking the dot product of t and u, which we just set up. RGB are standing in for XYZ. We’ll put t into input 1 and u into input 2 of the Custom Tool. In order to avoid having to type the entire formula three times, I’ll also use the c1 shortcut, which means “this channel from input 1” to get the initial t values. Since it’s been a while since we saw this expression, I’ll repeat it before we get to work:
t*dot(t, u)/t.z - u;
The expression for each color channel in Custom Tool is:
c1 * (r1 * r2 + g1 * g2 + b1 * b2) / b1 – c2
The parenthesis forces the dot product to be evaluated first, and the usual order of operations takes care of everything else. The last step is to knock out the “leftovers” outside of the original cone’s alpha by multiplying RGB by the original alpha. The result is thus:
Again, since Fusion expects values from -1 to +1 in its normals, it isn’t necessary to perform the last step of renormalizing the result for Red and Green, but we do need to fix Blue with a Gain of 0.5 and a Brightness of +1.0.
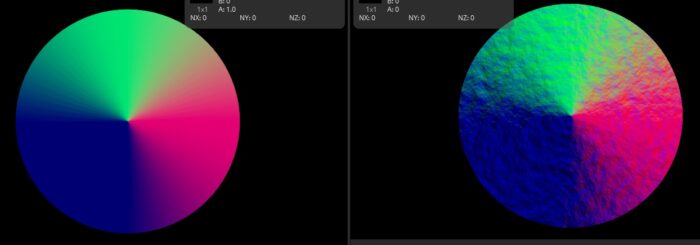
To test the result, I copied the new normals into their proper channel using a ChannelBooleans and used a Shader tool to examine the end product:
Looks pretty convincing to me! Want to play with the set-up? Click here to get my nodes.
Many thanks to Vito for setting me on the track, and of course to Mr. Hill for the algorithm. I’ll keep studying to learn what the heck a quaternion is!


