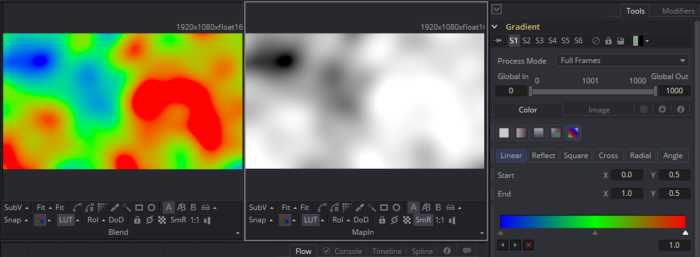
A quick little macro. A couple of days ago, I needed a gradient map, a la Photoshop. My brain was on the fritz all week, so I asked my excellent coworker Joe Laude for help. He did something with a Displace node that bent reality a little for me. I honestly still don't quite understand what's going on in his set up, although it definitely solved my immediate problem. After a couple of days of recharging, I figured out a more straightforward (though possibly slower) method using my favorite node: the Custom Tool.

The Problem: Assign a color from a linear gradient to an image based on the brightness of the pixels in an input map. I want to be able to manipulate the gradient with the same level of control that I get from a Background tool, mask it, and have a standard Blend slider.
The Solution: For each pixel, I need to evaluate its brightness and use that to pick a color from the linear gradient. As it happens, I solved this problem when I built my own Texture tool almost two years ago. The get function described there (look for the "Big Green Marker") does exactly what I want. All I have to do here is substitute a user-defined Gradient Map for the UV Map and a linear gradient image for the Raw Diffuse image.
Just to keep everything on the same page, as it were, in the Color Channels Expression fields, I place the following code (consult the Fusion Tool Reference, page 459, for more details on this function):
getr2d(c1,c1)
getg2d(c1,c1)
getb2d(c1,c1)
a1
That fetches the RGB information at x- and y-coordinates equal to the appropriate channel in the Map Input. Generally speaking, you should feed a grayscale image into the tool, but it can be biased by giving it a full color map, which serves to preserve a little bit of the tint of the original image.

It's subtle, but you can see a little bit of the green from the bushes on the right behind Christina's shoulder, and some of the pink in her make-up. (Apologies to Christina for bogarting this pic—it makes me smile every time I look at it, so I often use it for testing workflows.)
Here's the finished macro: GradientMap.setting
Enjoy!
After a day's thinking about it, this is much easier to accomplish by simply using the Texture tool. Just copy your brightness map into the UV channels. Put that into the Input and the gradient into the Texture input.
And then the kind people over at We Suck Less pointed out that the same thing can be done with the Fast Noise tool by plugging your brightness map into the NoiseBrightnessMap input, though it has to go through a Bitmap node first to convert it to a single-channel image. This method also allows some of the FastNoise's details to be mixed in.
1 Comment