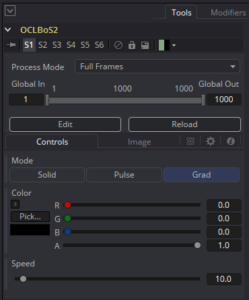
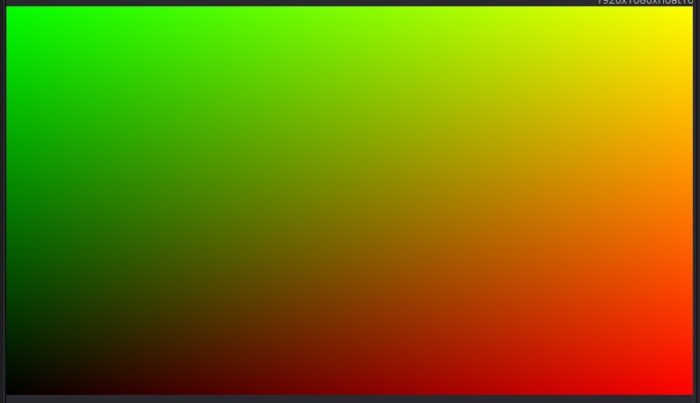
This is the third article in a series on OpenCL Fuse development for Blackmagic Fusion. I am attempting to convert the lessons from the Book of Shaders into working Fuses, learning a bit about programming and parallel processing as I go. I have no doubt that I violate dozens of best practices, as I am entirely self-taught in this area.
This time around, we'll look at how to introduce temporal and spatial variation into the generated image by creating a mode where the image slowly pulses and one where the color is tied to the pixel's screen position, making a gradient.
 First, I set up a MultiButton control that I can use to change modes. I'm building this Fuse on top of the previous one, so I can just click a switch to go from one mode to the next. I don't know how long I'll keep that up; eventually the tool will start to get cumbersome. Selecting the MultiButton shell from my template, I copy it into the Create() function and customize it to my needs:
InMode = self:AddInput("Mode", "Mode", {
LINKID_DataType = "Number",
INPID_InputControl = "MultiButtonControl",
{ MBTNC_AddButton = "Solid", },
{ MBTNC_AddButton = "Pulse", },
{ MBTNC_AddButton = "Grad", },
MBTNC_StretchToFit = true,
INP_Default = 0,
})
I also want some additional controls, like a color picker and speed control for the Pulse mode:
inRed = self:AddInput("Red", "Red", {
LINKID_DataType = "Number",
INPID_InputControl = "ColorControl",
IC_ControlGroup = 2,
IC_ControlID = 0,
LINKS_Name = "Color",
CLRC_ShowWheel = false,
INP_MinScale = 0,
INP_MaxScale = 1,
INP_Default = 0,
})
inGreen = self:AddInput("Green", "Green", {
LINKID_DataType = "Number",
INPID_InputControl = "ColorControl",
IC_ControlGroup = 2,
IC_ControlID = 1,
INP_MinScale = 0,
INP_MaxScale = 1,
INP_Default = 0,
})
inBlue = self:AddInput("Blue", "Blue", {
LINKID_DataType = "Number",
INPID_InputControl = "ColorControl",
IC_ControlGroup = 2,
IC_ControlID = 2,
INP_MinScale = 0,
INP_MaxScale = 1,
INP_Default = 0,
})
inAlpha = self:AddInput("Alpha", "Alpha", {
LINKID_DataType = "Number",
INPID_InputControl = "ColorControl",
IC_ControlGroup = 2,
IC_ControlID = 3,
INP_MinScale = 0,
INP_MaxScale = 1,
INP_Default = 1,
})
inSpeed = self:AddInput("Speed", "Speed", {
LINKID_DataType = "Number",
INPID_InputControl = "SliderControl",
INP_MinScale = 0,
INP_MaxScale = 360,
INP_Default = 10,
})
Remember that the Color controls are grouped, so extra care should be taken to manage the IC_ControlGroup and IC_ControlID parameters. Since this is the first Color control I have added, the default values from the template are fine. If I put in another one, I'll have to change the ControlGroup so as not to clash with existing controls.
To import the values from the controls into the Process() function, I've added these lines:
local mode = InMode:GetValue(req).Value
local red = inRed:GetValue(req).Value
local green = inGreen:GetValue(req).Value
local blue = inBlue:GetValue(req).Value
local alpha = inAlpha:GetValue(req).Value
local speed = inSpeed:GetValue(req).Value
Also, I set up a generic black Pixel that can be used as needed:
local p = Pixel({ R = 0.0, G = 0.0, B = 0.0, A = 1.0 })
That MultiButton outputs an integer value from 0 – 2, and I use a simple if-then-else control structure in Process() to handle it:
if mode == 0 then
local kernel = prog:CreateKernel("hello")
if kernel then
prog:SetArg(kernel, 0, outcl)
prog:SetArgInt(kernel, 1, img.Width, img.Height)
prog:SetArg(kernel, 2, red, green, blue, alpha)
success = prog:RunKernel(kernel)
end
elseif mode == 1 then
local kernel = prog:CreateKernel("pulse")
if kernel then
prog:SetArg(kernel, 0, outcl)
prog:SetArgInt(kernel, 1, img.Width, img.Height)
prog:SetArg(kernel, 2, red, green, blue, alpha)
prog:SetArg(kernel, 3, req.Time)
prog:SetArg(kernel, 4, speed)
success = prog:RunKernel(kernel)
end
elseif mode == 2 then
local kernel = prog:CreateKernel("grad")
if kernel then
prog:SetArg(kernel, 0, outcl)
prog:SetArgInt(kernel, 1, img.Width, img.Height)
success = prog:RunKernel(kernel)
end
else
out:Fill(p)
end
In the "hello" call, I have added another SetArg() line to pass the color from the control panel to the kernel. I'll show the modified kernel in a few moments. The "pulse" kernel gets the additional values req.Time, which is the current frame number taken from the Request object, and speed. The "grad" kernel may eventually take customized colors, but for now it needs only the image buffer and no other data.
That last entry fills the image with black, just in case the Mode button malfunctions and gives us something outside the expected range of 0-2.
Back to the Book of Shaders. One concept that is critical to keep in mind when you're dealing with parallel processing is that certain information that is available to all of the threads is immutable—it cannot be changed and is thus equal for every thread. GLSL calls such data a "uniform." In OpenCL parlance, the equivalent qualifier is "const." I am not using the const qualifier here, but maybe it would be a good idea in order to be certain I don't corrupt my kernel by changing a value that should never be changed, such as the current frame, the image size, and the pixel position.
For the pulse mode, here is BoS' code:
void main() {
gl_FragColor = vec4(abs(sin(u_time)),0.0,0.0,1.0);
}
Once again, we'll have to turn that single line into three to handle I/O:
kernel void pulse(FuWriteImage_t img, int2 imgsize, float4 col, float time, float speed)
{
int2 ipos = (int2)(get_global_id(1), get_global_id(0));
float4 outcol = (float4)(fabs(sin(time*speed/360)), col.y, col.z, col.w);
FuWriteImagef(img, ipos, imgsize, outcol);
}
I've made a small modification to add the speed control. OpenCL, due to its strong typing, has different functions for some things depending on the data type. The GLSL function abs() is replaced with our fabs() to get the absolute value of a float. sin() works just the same, but it's important to realize that expects radian measures. Our time variable is a little different from BoS', also. In the GLSL example, u_time is the time in seconds from when the program was started. Our time is a frame number passed in from Fusion. The consequence of this is that our time parameter increases 24 – 60 times more rapidly than the example's. The result is a color that flickers rapidly; the sin() function goes around its cycle every π frames (because we're using fabs(), the wave is reflected, which effectively doubles its frequency).
The short version of all of that is that I am dividing by 360 to turn degrees into revolutions. Then I multiply by the speed control to set the actual frequency in a way that makes some kind of logical sense.
The pulse is only happening in the Red channel. The other three have been set based on the inputs from the control panel. OpenCL assumes that any matrix variable is a position, so addressing the sub-components of the float4 col variable requires us to use x, y, z and w. Therefore, col.y is the green component. It might eventually be fun to put pulse behaviors in all the channels, with different speeds to create some interesting patterns of shifty colors. The wave could be multiplied by the input color, and that could even be animated from the control panel to create some very unpredictable results.
Moving on… The third mode I would like to add creates a horizontal gradient in the red channel and a vertical gradient in the green channel. Here's the BoS code:
void main() {
vec2 st = gl_FragCoord.xy/u_resolution;
gl_FragColor = vec4(st.x,st.y,0.0,1.0);
}
gl_FragCoord is a default input that holds the screen coordinates of the pixel (screen fragment, which is where the term fragment shader comes from) it is working on. Our OpenCL implementations have to import this information from Fusion and explicitly pass it back to the image buffer, but on the plus side, it means that we've already seen an equivalent value in both of our previous kernels: we're calling it ipos.
We can't use the position value directly, though, because it is measured in pixels and will therefore have values well in excess of our white point of 1.0. We need to normalize the coordinate by dividing by our overall resolution, again handily already available in the imgsize variable. Normalization places the number into the range 0-1, which is convenient for most color operations.
We immediately run into some trouble from OpenCL's strong typing, though. We can't get a floating-point value by dividing two integers, and a normalized integer can only have two values: 0 or 1. We need to convert both of the integers into floats prior to normalization. Here's my code:
kernel void grad(FuWriteImage_t img, int2 imgsize, float4 col)
{
int2 ipos = (int2)(get_global_id(1), get_global_id(0));
//normalize the pixel position
float2 iposf = convert_float2(ipos);
float2 imgsizef = convert_float2(imgsize);
float2 st = iposf/imgsizef;
float4 outcol = (float4)(st.x, st.y, 0.0, 1.0);
FuWriteImagef(img, ipos, imgsize, outcol);
}
I've appended an f to the end of the two variables I am converting, just to keep things straight. You can see that I capture the int2 ipos as usual, then convert both it and imgsize into float2 using convert_float2(). Once that is done, I can use the new floating-point versions of the numbers to get a normalized pixel location as a percent of the screen width and height. That is substituted into outcol, creating the two desired ramps.
The ability to make calculations based on screen space is crucial to pattern creation, and access to time makes procedural animation possible. We'll use both of these powerful tools quite a bit in upcoming articles. Coming up next are some functions for controlling interpolation.
<< Previous Article — Hello, World!
Next Article — Interpolation >>
